Monday, 6 April 2015
Mid-autumn is a good time for chickens because they’ve regrown their feathers after the summer moult just in time for the weather to turn cooler when they’ll really be requiring all of those feathers to keep warm. It is sort of like being able to grow your own woolly jumper just as the weather turns cold. It’s a neat trick for a chicken. Chickens however, have a great deal of difficulty producing eggs and growing feathers at the same time so egg production has seriously declined (but never ceased) over the past month or two, and this week egg production has picked up again! Eggsellent work ladies.
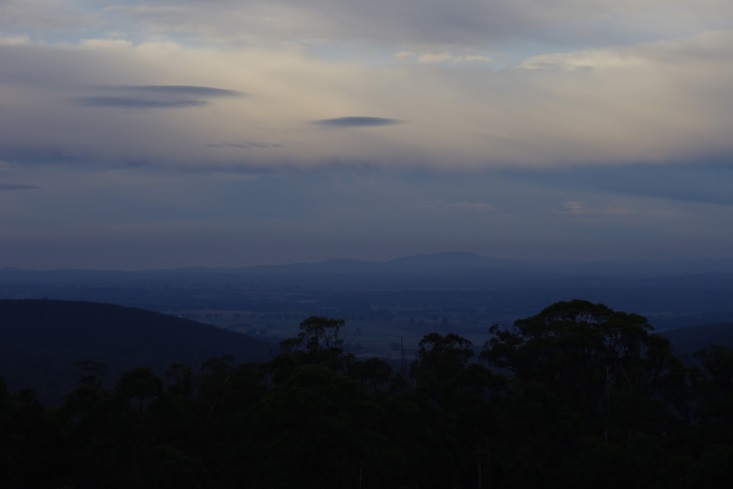
Just to show you how cold the nights are getting here, you can see in the photo below that all of the cold air from the farm has settled in the valley below.
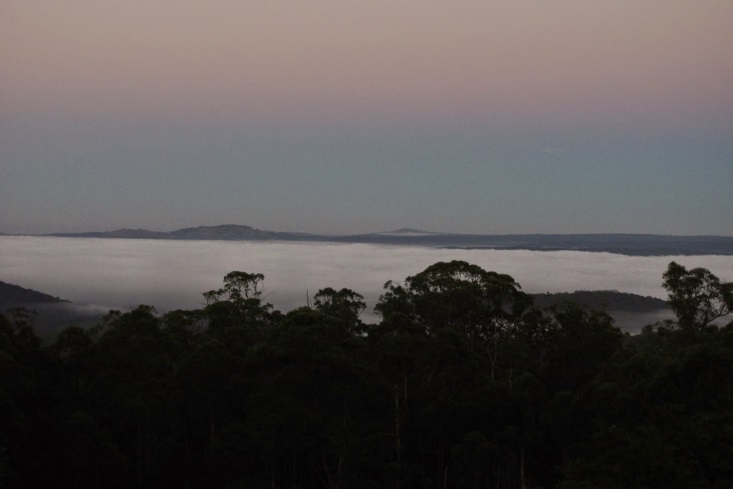 |
| Frost and fog settling in the valley below the farm |
Cold air is heavy so this means that it falls downhill and collects in valleys. Because of that little trick, frost is quite rare at this elevation. It does get cold here over winter but most of the time it doesn’t freeze!
Speaking of rare events, a few days ago there was a blood moon. A blood moon is where the shadow of the earth completely covers the moon and as a really weird side effect, the moon turns red. I took the photo below at around 11pm that night and together the moon and earth put on a good show:
 |
| Blood moon over the farm |
With egg production slowly increasing (maybe it was the blood moon?) I thought that it might be interesting to show all of the different sizes and colours of eggs that get produced here. I keep a lot of different chicken varieties and they all lay very different coloured and sized eggs. Different varieties of chickens also produce eggs at different times of the year, so it is good to keep a diversity of chickens because that will ensure that you have fresh eggs every day of the year. A good example is the Silky variety of chicken which if I was being entirely honest, don’t produce many eggs per year and are also very prone to indulging their more maternal side (i.e. going broody). However, the Silky has an advantage as she will produce eggs during the late summer to early autumn months when all of the other chickens have stopped producing eggs. This is because the Silky chicken does not moult as heavily as other chicken breeds.
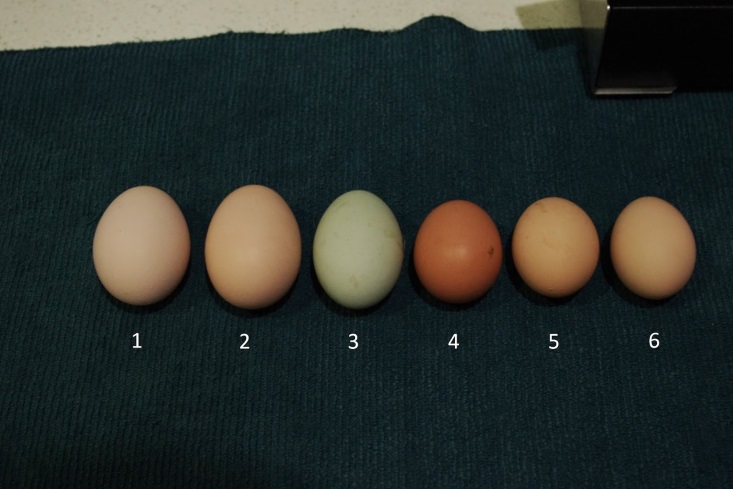 |
| The various eggs produced by the chickens at this time of year |
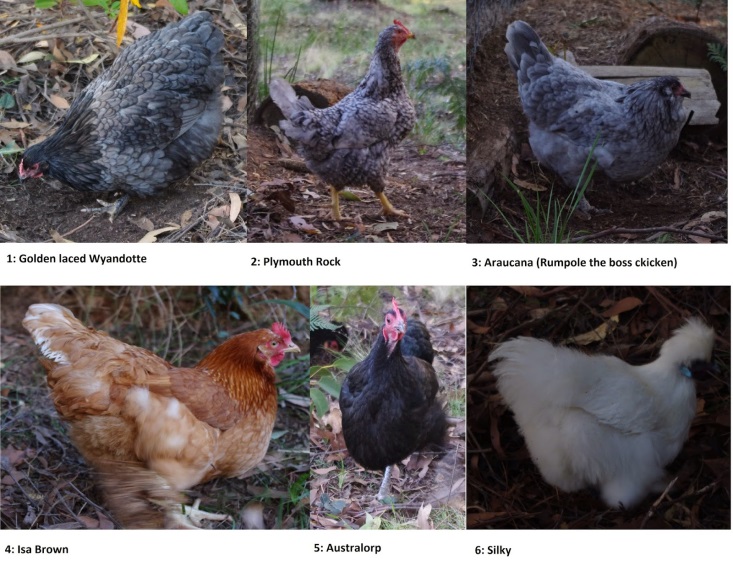 |
| Chicken secrets are revealed as the eggs are associated to the various chicken varieties here |
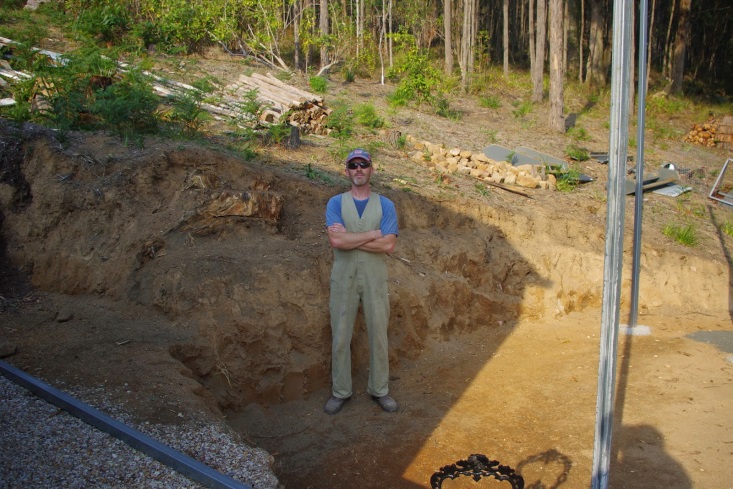
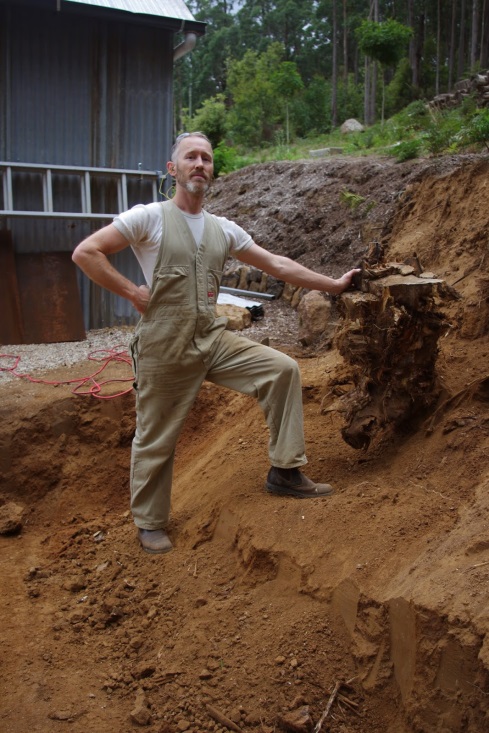
The excavations for the flat site for the new wood shed continued this week. In the photo below you can see Sir Scruffy ambling away from the excavation site (from fear of hard work) as a very old and very large tree stump is exposed. The very old tree stump will take perhaps half a day to remove and there is probably about one to two days of further excavations before the frame of the new wood shed can commence in earnest.
 |
| Sir Scruffy ambles away from the excavation site for the new wood shed |
As an individual, I have few regrets. However, one regret I have is that I planted too many zucchini (courgette) plants during the summer. The fruits were harvested this week as I was a bit scared that they would grow even larger and more prolific!
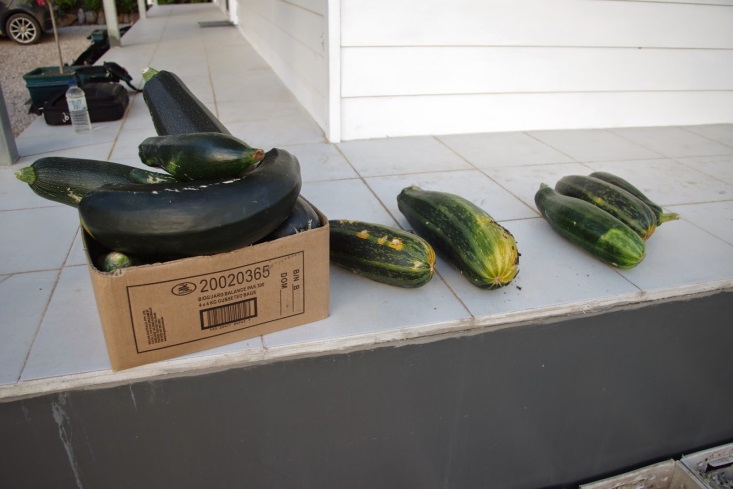 |
| Zucchini fruits were harvested this week |
The tomato harvest is also occurring and I’ll be picking ripe fruit until early winter. Each year some fruit has to be set aside so that the seeds can be saved so that new plants can be started in early spring (September). This week I chose some of the excellent tasting fruits from very hardy plants in order to save the seed:
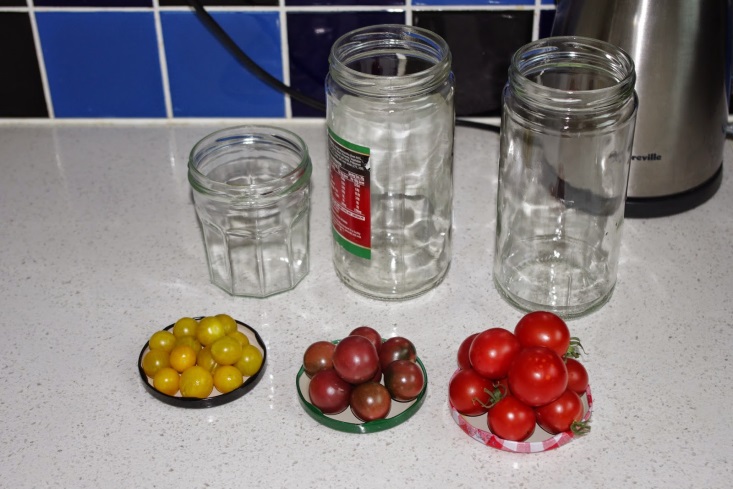 |
| Tomato fruit set aside for the seeds to be saved |
A few months ago, I collected seed pods from the local Blackwood trees (Acacia Melanoxylon). This week those same seeds have been left in hot water overnight (which breaks their dormancy) and then planted out into a raised garden bed which has been left alone for that purpose.
 |
| Blackwood (Acacia Melanoxylon) seeds are placed into the raised garden bed |
Earlier in the week I travelled to the Bacchus Marsh seedling farm and picked up some new and interesting flowering plants. Plus one day during the week found me in the inner city and I stopped by the CERES plant nursery in Brunswick and picked up another tea camellia (Note to Lewis: Yeah, I’m giving the plant another and very final go!) which is the same plant used to produce the tea beverage.
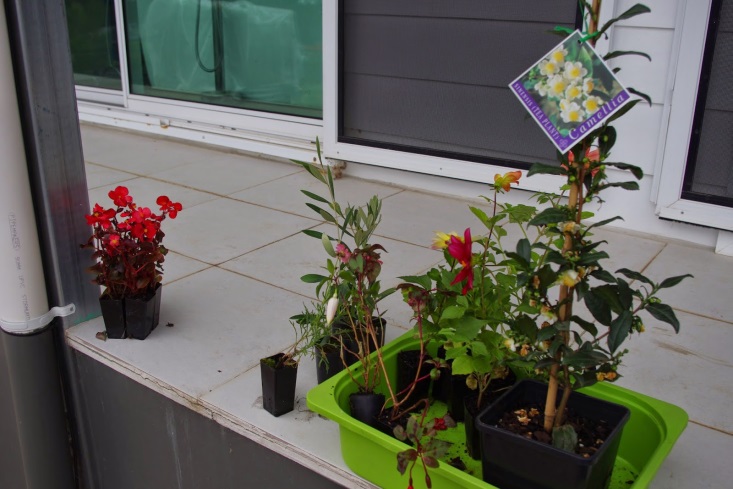 |
| New and interesting flowering plants waiting to be planted |
Over the past few days, I’ve planted out a hedge of olive trees. Olive trees are particularly prolific around these parts and over the next few weeks I’m hoping to harvest the olive fruit and cure them in brine. I have not done that curing process before so it should be very interesting.
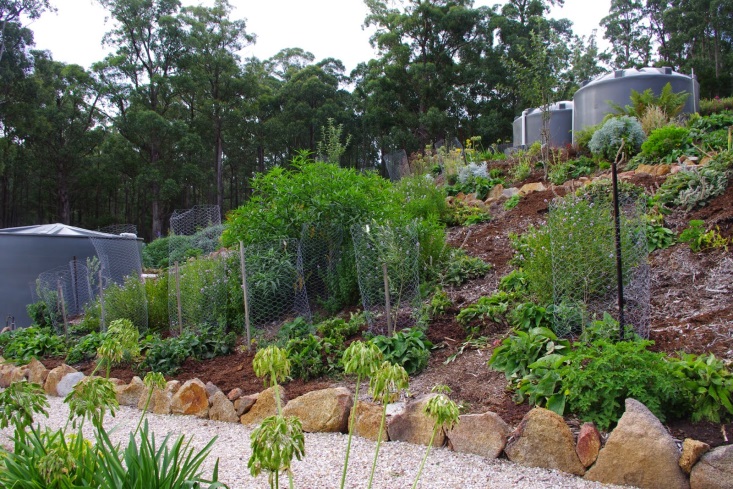 |
| Olive trees planted in a hedge – note that the trees are in metal cages to protect them from wallabies |
Over many years, I have brought up to the farm a truly massive quantity of mulch and compost. I thought that it might be worth showing how a cubic metre (1.3 cubic yards) of mushroom compost can be quickly removed from the trailer and transported to anywhere on the farm.
The technique used to remove mulches and composts from the trailer is simply to use a rake to scrape them off the back of the trailer into 3 crates. The farm has an area set aside for unloading these materials and it is a very quick process.
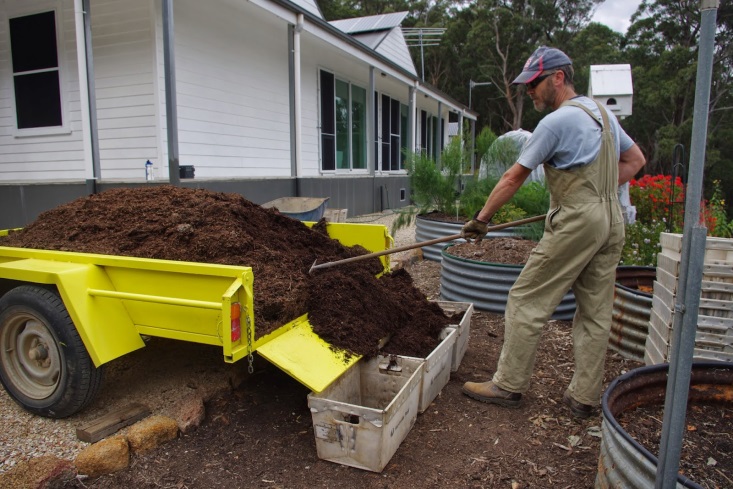 |
| Using a rake to scrape mulches and composts off the back of the trailer into 3 crates |
Those 3 crates are then loaded onto a wheelbarrow and simply wheeled anywhere they are needed around the farm.
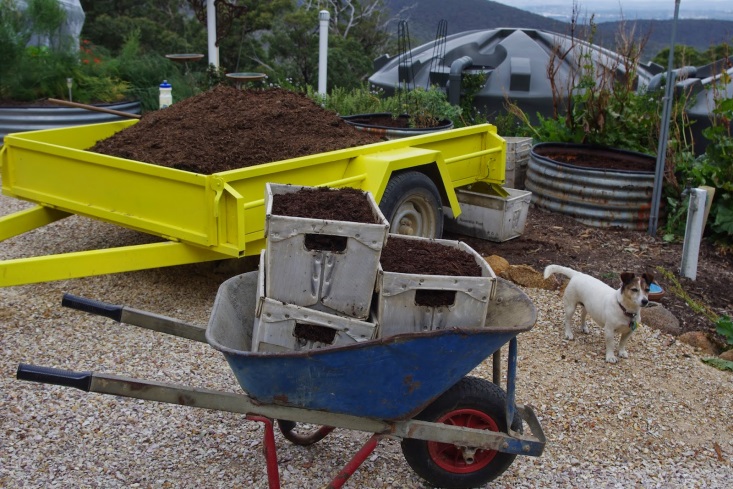 |
| Scritchy the boss dog looks on with approval at the efficiency of the unloading process for materials |
Generally there are 30 crates to a cubic metre (1.3 cubic yards) and that means only 10 wheelbarrow loads. The mulches and composts never go as far as you’d think and you can always use more!
How did the house get here?
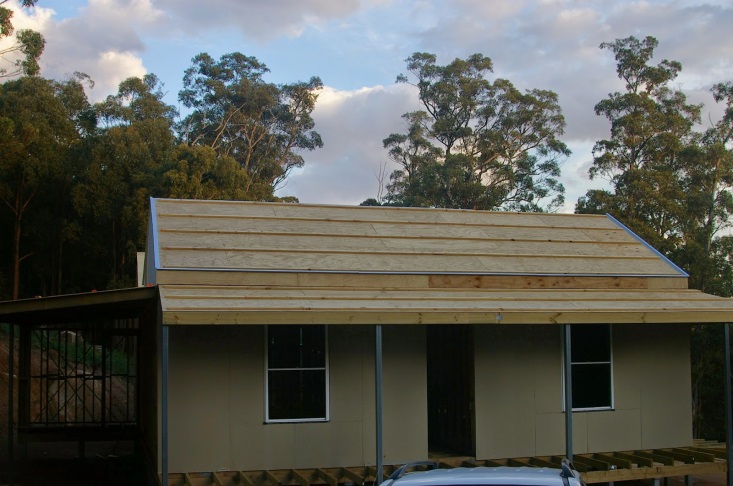
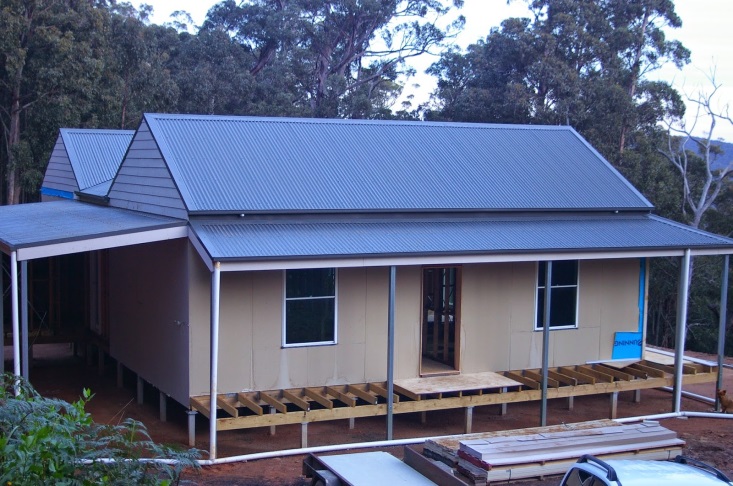
Over the following month (March 2010) the frame of the house was almost complete. Very observant readers will note that in the photo below the veranda posts which are the only exposed bits of the house frame were all required to be galvanised steel – due to the bushfire risk.
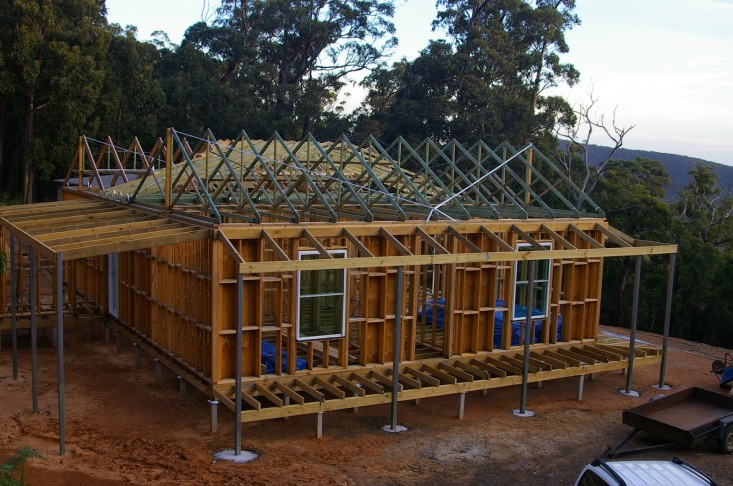 |
| The house frame is mostly complete as of March 2010 |
Once the house frame was completed, I could then commence cladding the exterior walls. It was always my intention to make the house super insulated (which Down Under meant double thickness walls at 200mm or 7.87 inches of timber). As I began cladding I realised that some sections of the wall had plywood backing which performed a bracing function for the house and needed to be insulated prior to installing the external cladding. On those sections I added the insulation prior to covering the external frame with commercial grade 16mm (0.64 inch) fire retardant and wet resistant plaster.
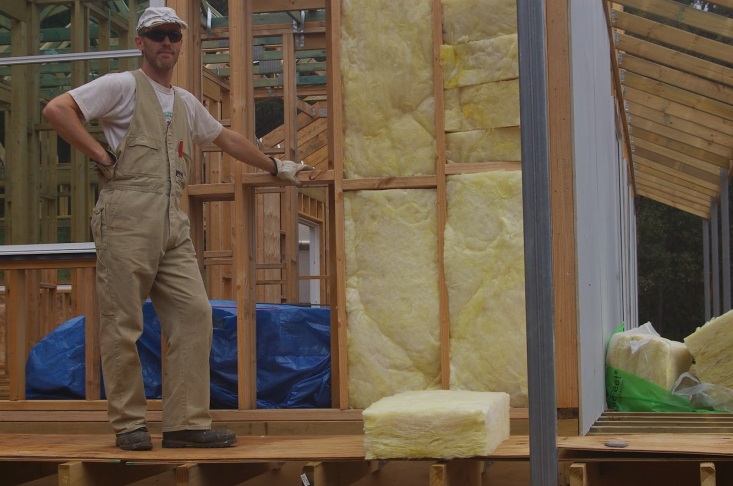 |
| Very thick insulation is installed into the timber wall frames prior to cladding with fire rated plaster |
On several occasions as an experiment, I have tried to burn scraps of the fire rated plaster in very large and very hot bonfires and that stuff just doesn’t burn. Even the following day after the bonfire, the labelling on the back of that plaster can still be clearly read. It is uncanny and sort of weird. In the photo below I’m leaning against some of the almost 5 tonnes of fire rated plaster installed onto the internal and external walls of the house admiring my handy work.
 |
| Leaning against the very strange fire rated commercial plasterboard and admiring my handy work |
To be continued…
The temperature outside here at about 8.30pm is 8.6 degrees Celsius (47.5’F) and a storm is threatening to arrive in the next few hours. So far this year there has been 163.4mm (6.5 inches) of rainfall which is up from last week’s total of 162.6mm (6.4 inches).
Posted by Cherokee Organics at 20:51 16 comments: ![]()
13 April 2015
The leaning tower of water
Today the sun was shining and the weather was sweet. It was almost the perfect autumn day.
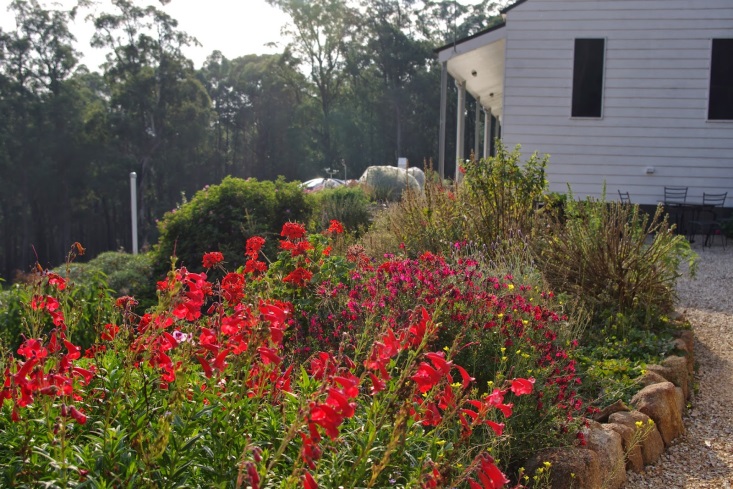 |
| Various flowers enjoying the gentle autumn sunshine today |
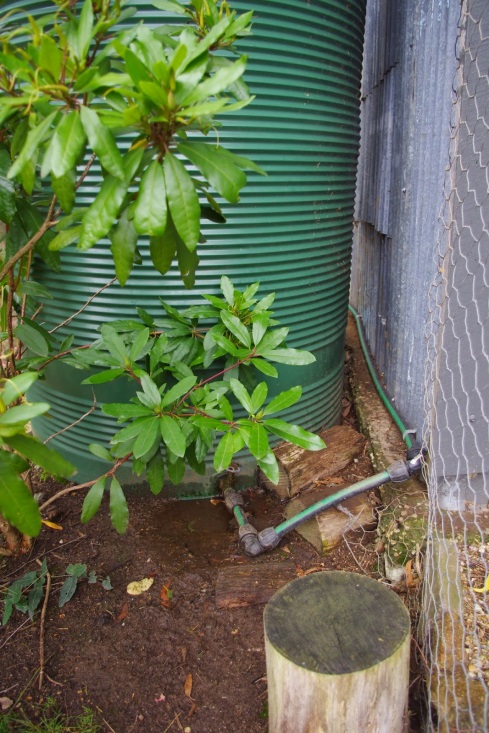
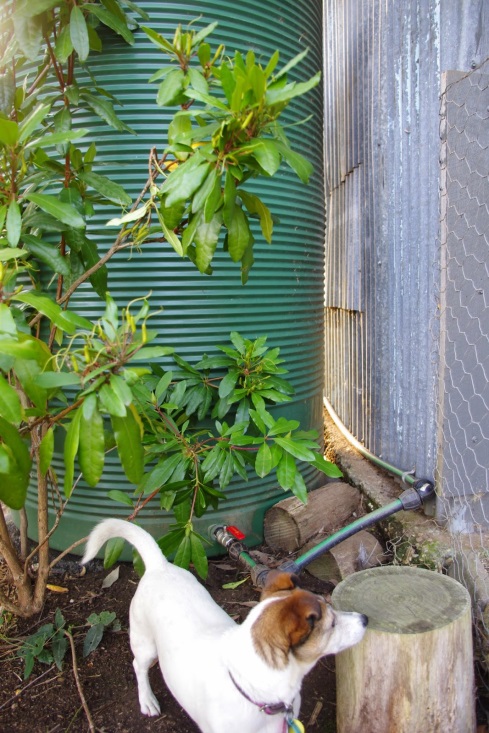
Over the past few weeks the water tank that supplies water for the chickens has started to tilt over at an unusual angle. It is a bit of a problem for the chickens as when the water tank is full it weighs around 2,150kg (4,740 pounds). That means that if the water tank fell over onto the chicken enclosure it could possibly destroy it taking out the chickens as well! Just to add insult to injury, the valve on that water tank failed for some unknown reason and has started leaking water.
 |
| The leaning tower of water tank and its dodgy valve |
The water system for the chickens is great because it uses no energy. Rainfall is collected on the steel roof of the chicken house and then channelled into a steel gutter. From there, that rain water is directed into the top of the water tank via plastic pipes. At the bottom of the water tank a pipe then takes that water into the chicken enclosure which is then accessed via a normal garden tap.
However, when the valve on the water tank failed, it leaked all of the stored water until the tank was empty. It looks good, it just doesn’t work. On a positive note, the large rhododendron next to the water tank was quite pleased with all of the extra water over the past few weeks and has put on considerable growth.
A couple of Australian / Canadian friends visited for lunch yesterday and I volunteered one of them to assist with repairing the water tank situation (thanks mate!).
The pipes were disconnected from the water tank and then the water tank was removed. A thick layer of rock crusher dust (granite) was then placed onto the area where the water tank was going to sit and the area was levelled flat using a long spirit level. The faulty valve on the water tank was replaced as well.
When the water tank was lifted back into place, we heard a strange crunch sound. Fortunately, it wasn’t Scritchy the boss dog underneath the tank – although that was a likely possibility. We’d broken one of the pipes that fed water into the water tank off the roof of the chicken enclosure. Anyway, after a couple of minutes of repair work which involved replacing the broken elbow (that is a fancy name for a right angle bend in the pipe) all was good again.
I filled the water tank up today from the house water tanks and the chickens now have drinking water again. It is worthwhile mentioning that the area is now much drier and I’m yet to receive a complaint from the now thirsty rhododendron!
 |
| Scritchy approves of the now vertical water tank with a brand new valve |
The previous day I’d purchased a third of a cubic metre (0.43 cubic yards) of rock crusher dust for the water tank repair job. That was a serious over estimation of the requirements as there was plenty of material left over in the trailer after the repair had been made. What to do with all of that rock crusher dust? I remembered that rock dust is an excellent fertiliser so all of the excess material was thrown onto both the garden herb and flower beds.
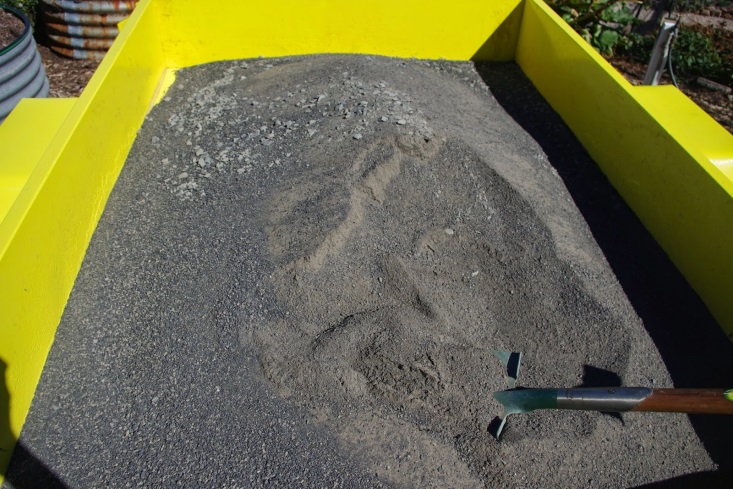 |
| Excess rock crusher dust sits in the trailer ready to be used as fertiliser |
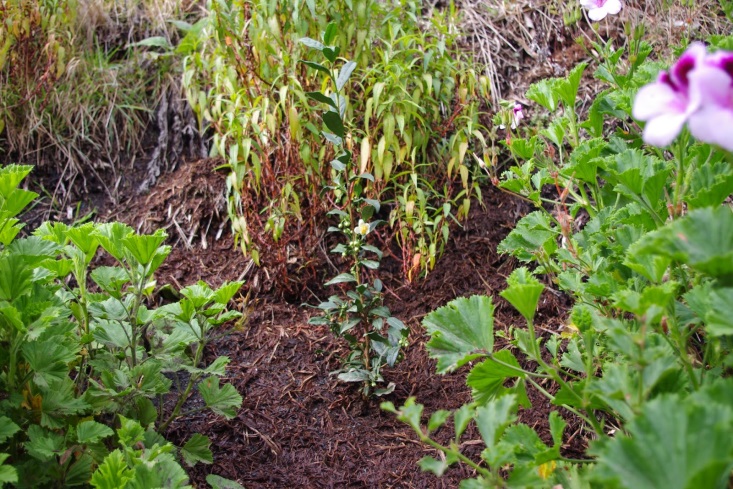
All of that fertiliser must be doing something here because this week, the tea camellia appears as if it will soon produce flowers. This is the fourth and final time I intend to try a tea camellia plant here as all of the others have died. Still, with each plant death, I’m learning what those plants don’t like here. What they actually do like is a completely different question! This final chance plant is protected from the summer sun by the shade of a Japanese maple. It is also protected from the cold southerly winter winds by the house and very well established geraniums to either side. The Vietnamese mint behind the camellia may provide some protection from light frosts. If this tea camellia dies, I’m giving up on them!
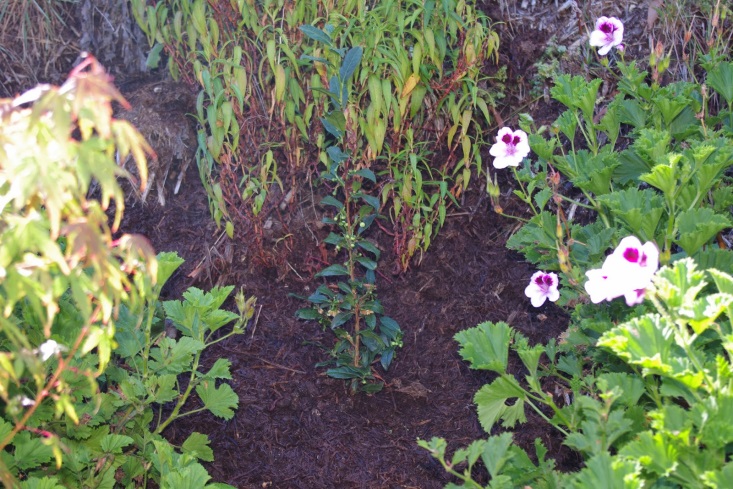 |
| Tea camellia looks as though it will soon produce flowers |
With the almost one inch of rain received here during the past week, one of the Jerusalem artichokes fell over. Now, it is worth mentioning that a year or so back, I picked up a box of the tubers and planted them all over the place. There must be at least 50 of the plants happily growing here. It was a bit of a surprise then to discover just how many tubers one Jerusalem artichoke produces because when the plant fell over it dislodged only half of the tubers growing beneath it. The photo below shows the half of the tubers that were dislodged from the soil whilst the other half are still in the ground. Help! Has anyone tried any good recipes with the tubers that they’d recommend?
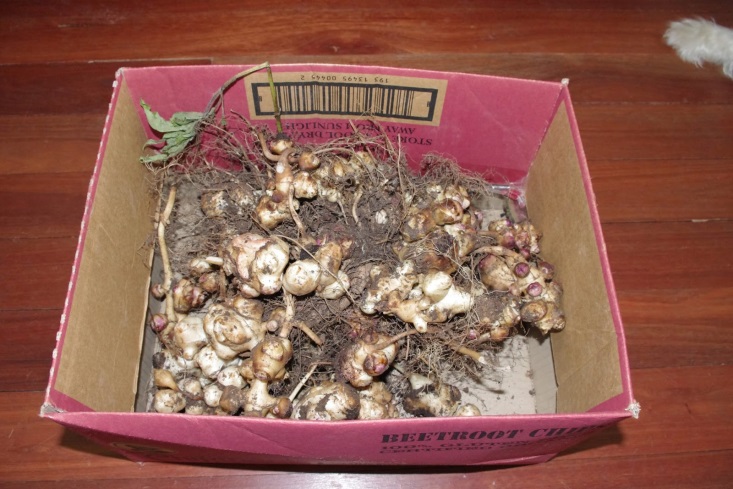 |
| The box containing the harvest from half of the tubers from a single Jerusalem artichoke plant |
Excavations continued this week for the flat site for the new wood shed. Observant readers will note that the old tree stump has been considerably reduced in size too. Hopefully the excavations will be mostly complete over the next week and then construction of the wood shed can commence in earnest.
 |
| Excavations for a flat site for the new wood shed continued this week |
The firewood bay was filled up again today and I thought that it might be worthwhile showing one of my favourite tools here at the farm. This favourite tool is the electric log splitter as it makes splitting the very hard local timber (Eucalyptus Obliqua has a density of 650kg/m3) here really easy and quick. Plus given the farm relies on 100% solar power off the grid, the electric log splitter uses energy that would otherwise go to waste.
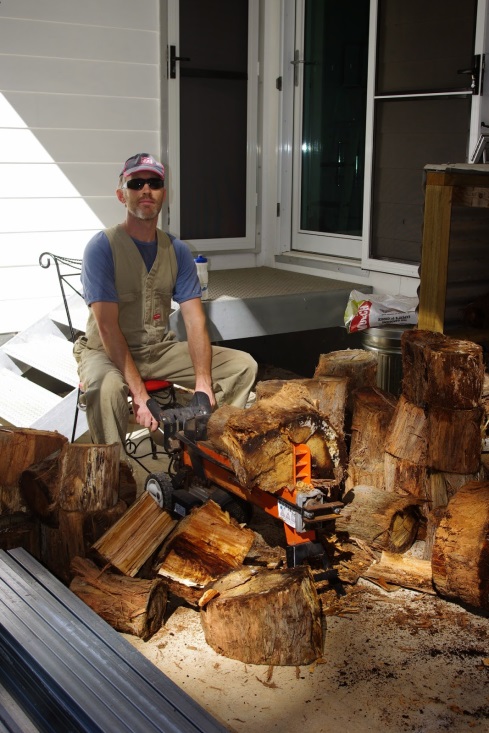 |
| My favourite tool, the electric log splitter |
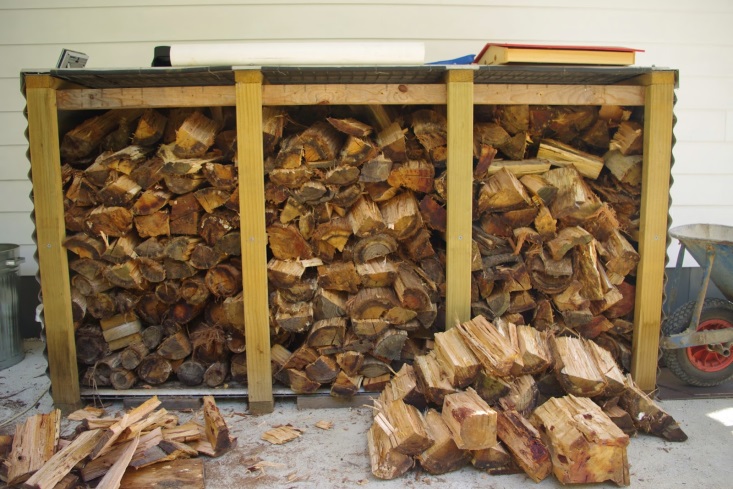 |
| Happiness is a full firewood storage bay. It is like money in the bank! |
How did the house get here?
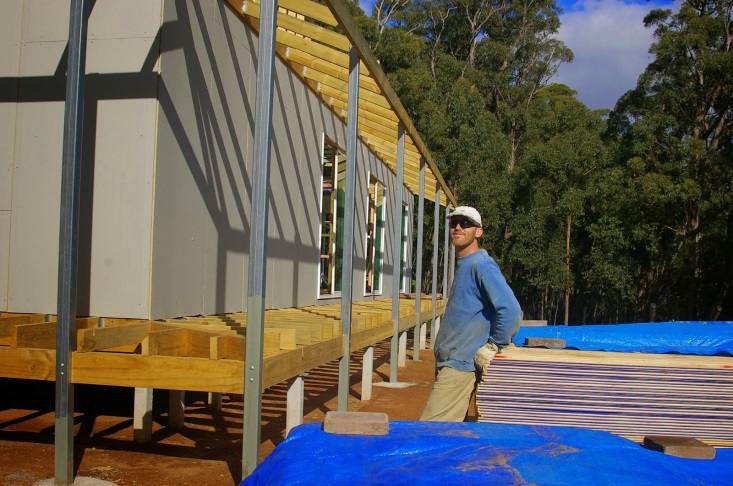
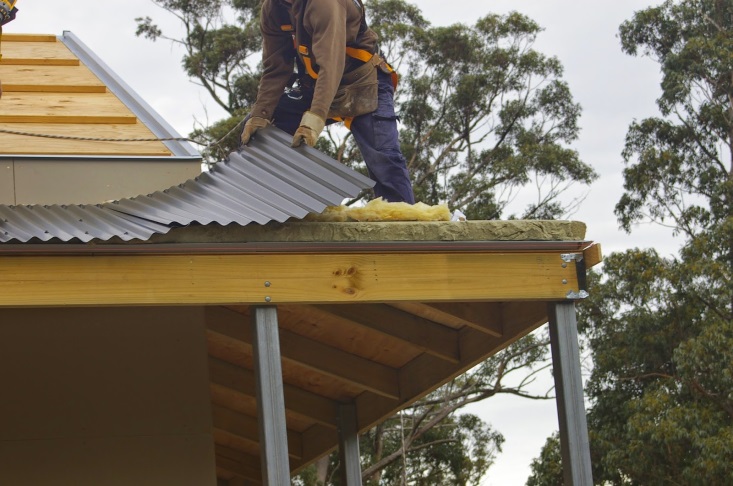
Almost 5 years ago this month, the external walls of the house were mostly covered with the very heavy fire rated plaster. At this time of the year, the weather is starting to turn cooler and wet and it was a bit of a race to have the steel roof sheeting installed by the plumber whilst it was actually still possible to do so.
In the meantime, the timber industry association had developed a roof design that could survive the very difficult 30 minute fire test. I had no other choice than to build the roof as per that design. The roof here is certainly one of the more unusual roofs that you might happen to see in a house.
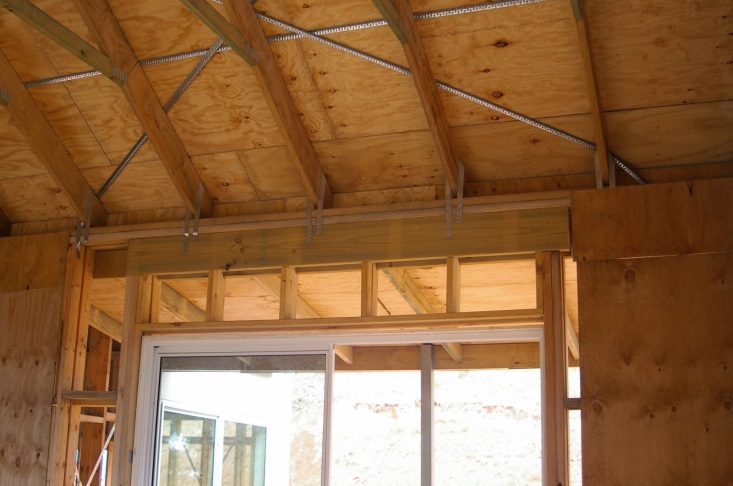
What you can see in the photo below is that 15mm (0.6 inch) flooring plywood was laid over the roof supporting timbers. Specially made steel flashings were installed over any edges or ridges. They were a bit of a nightmare to design and specify and there was only a single supplier on the northern side of Melbourne that could make them in the quantity required. At that point I had a bit of a freak out as the sheer detail almost overwhelmed me, but I got through that – with a bit of help and luck – and a nice editor! Fortunately, the flooring plywood meant that walking around and over the roof was a relatively easy process so construction was quite fast.
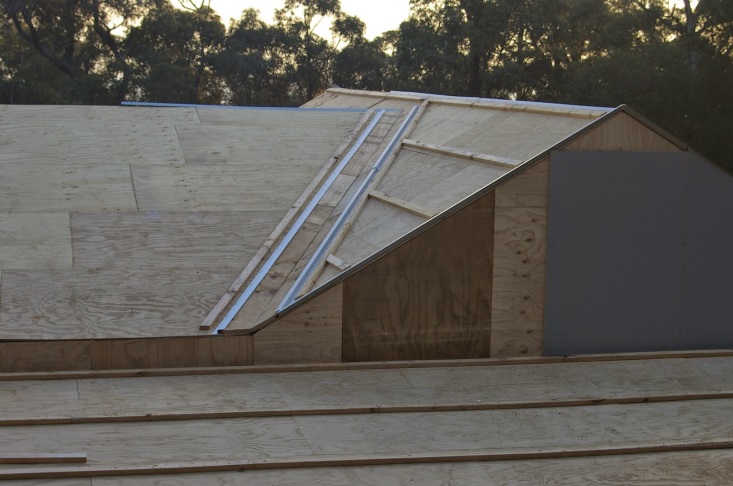 |
| The detail involved in the roof construction was extreme due to the fire requirements |
The photo above shows that the fire rated plaster which is installed onto the external walls butts up against the steel flashings. It is all a very detailed and very clever design.
 |
| My work on the roof was complete and the plumbers could begin |
And then one day my work on the roof was complete and the plumbers could begin their work.
The plumbers didn’t have it easy either as they had to install a fire blanket that sits over the plywood. In addition, butting up against all of those steel flashings was a commercial grade mineral wool that they also had to install. Yes, this is the stuff found in and around industrial furnaces and the like. It was very hard to purchase this stuff and the designers specified that only a single brand and product could be used and no others could be substituted.
The steel flashings and mineral wool work to stop embers from entering into the roof space. The plywood provides a support for the fire blanket, which is there as a last resort should any embers actually enter the roof space. The walls are sealed with fire rated plaster to the steel flashings and so embers are unlikely to get into the walls.
The roof sheeting goes on top of all of these layers so that the roof is fully sealed to the outside world. It was no easy feat for any of us!
 |
| Plumbers begin to install the roof sheeting before the weather turns cold and damp |
To be continued…
The temperature outside here at about 7.00pm is 11.4 degrees Celsius (52.5’F). So far this year there has been 189.2mm (7.4 inches) of rainfall which is up from last week’s total of 163.4mm (6.5 inches).
Posted by Cherokee Organics at 22:31 ![]()
20 April 2015
Hen’s teeth
Regular readers will know that I’ve been in the process of building a steel firewood shed for a few months now. I like to do projects as cheaply as possible and that means using recycled, second-hand or down-graded materials and the firewood shed is no exception. Recently a good supply of corrugated galvanised iron cladding has eluded my best scrounging efforts. However, the past Saturday morning I hit pay dirt.
Hitting pay dirt meant driving north to the inland town of Bendigo. In the 1850’s that part of the state produced some of the biggest gold finds in the world, and the town itself has a colourful history and beautiful old Victorian buildings. Precious metal is still being found there today as there are several active gold mines in the town. However, I was after a precious metal of a very different sort: corrugated galvanised iron sheeting. A visit to a house demolition and salvage yard in the industrial area of that town produced a reasonable quantity of the iron sheeting. I took everything they had. The helpful bloke, who looked exactly like the sort of person that you’d expect to find in that business, sold me the material and remarked that: “This stuff is as rare as hen’s teeth, mate!” Newer corrugated sheeting which can be purchased now is much thinner and a whole different alloy (zincalume) than this older material. There are still old houses made from this older tougher material in the inner city of Melbourne.
The steel sheets were loaded onto the bright yellow trailer, securely strapped down and then I began the slow process of driving back to the farm. If during the drive back, the steel sheets became loose, they could have easily flown off the back of the trailer and this would be a serious hazard to anyone else on the road. Just to add a degree of difficulty to the transport, the edges of the steel sheet are quite sharp and they can cut through the nylon ropes and tie down straps used to hold the steel sheets firmly to the trailer. Transporting any steel sheets requires you to keep one eye on the road and the other on the contents of the trailer. By the time I made it back to the farm only a single rope had been broken by the razor sharp edges of the old iron, which was OK as I had used multiple and redundant ropes.
 |
| Steel sheets waiting on the now muddy yellow trailer waiting to be unloaded |
A couple of hours after getting the steel sheets unloaded a slow moving storm moved over the area. Then it rained, and just for good measure it rained some more. Excavations were not possible. I dislike mud and the site for the wood shed was threatening to turn into a serious mud pit. I’ve heard that some people like mud pits (perhaps for wrestling), but I remain unconvinced! Anyway, a couple of trailer loads of crushed limestone were spread around the area. The rocks are actually sourced from a nearby quarry which has long been quarried by humans for millennia because it is a major source of flint. Take that mud!
 |
| Crushed limestone has been distributed around the excavation site |
Observant readers will note (soil geek alert!) that as the weather has become cooler and the rainfall is now exceeding the evaporation, the volcanic loam has turned from an orange red colour to a much darker brown. This change reflects an increase of water, organic matter and biological activity in the soil itself.
A couple of weeks back I had to move two rhubarb plants as they were in a location that was better suited to other plants. Rhubarb must be one of the easiest plants to multiply because the process involves digging the plant out of the ground roots and all. Then using a spade or a knife (or whatever) to cut the root system into as many plants as you feel comfortable making. The basic rule is if some of the root system is attached to come of the stalk and perhaps a leaf, you should get a new plant. Then bang that chunk of rhubarb root into the ground somewhere else and you’ll get another plant. It is an easy process and I’m not even remotely careful of the plants during the process.
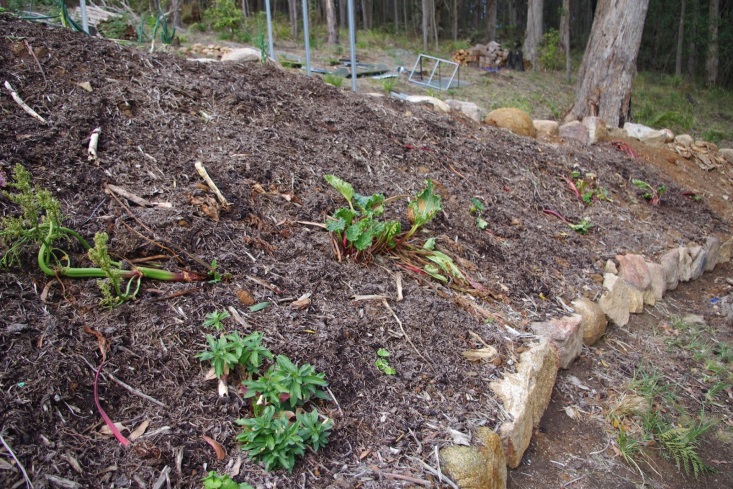 |
| Seven new rhubarb plants have taken hold and are starting to produce new leaves |
Over the past few years I’ve been observing the various plants here to discover what plants the wallabies will eat and which ones they’ll avoid. Your average wallaby is the ultimate plant browser as they can eat plants that are very toxic to humans. In fact they can survive on a diet of 85% bracken fern, and that plant is way toxic to humans and most live stock. One summer a few years back during a severe drought the wallabies began eating the citrus trees and they caused quite a lot of damage. However, there are some plants that the wallabies just don’t like and one of them is the scented geranium. Those plants grow so fast here that I use them as a living fence and they are very effective at keeping the wallabies out of a new garden bed.
 |
| Scented geraniums used as a living fence to protect the plants behind it from the wallabies |
Those scented geraniums should be renamed: Wallaby bane! And, unfortunately the plants fail to keep dogs out of the garden beds. The photo below shows a garden bed trying to get established without the scented geranium fence and you can see that most of the plants have been browsed:
 |
| Garden bed without the scented geranium living fence |
In breaking tea news: The tea camellia has really enjoyed the protected spot, as well as some decent rainfall and it has even managed to put on a bit of new growth and produce a flower.
 |
| The tea camellia has produced a flower and some new growth |
Autumn is still a good time for harvesting edibles. The citrus have also enjoyed the cooler, rainy weather and are producing copious quantities of fruit. The main crops here are lemons (two types), limes and pomello (a sort of grapefruit).
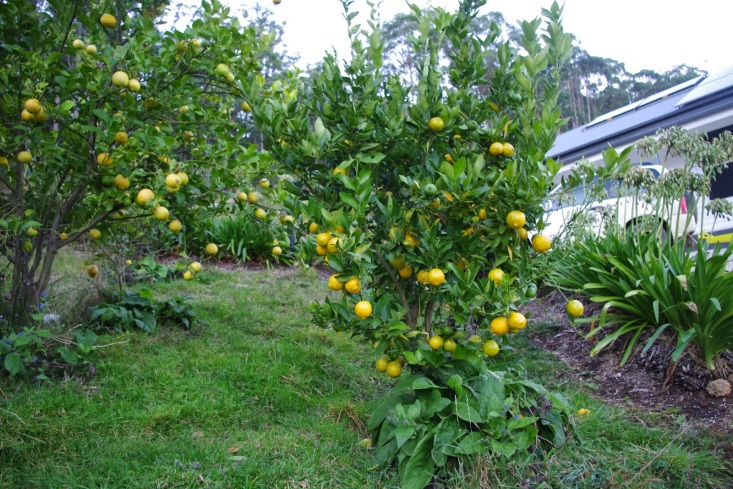 |
| The citrus trees are enjoying the cooler, rainy weather |
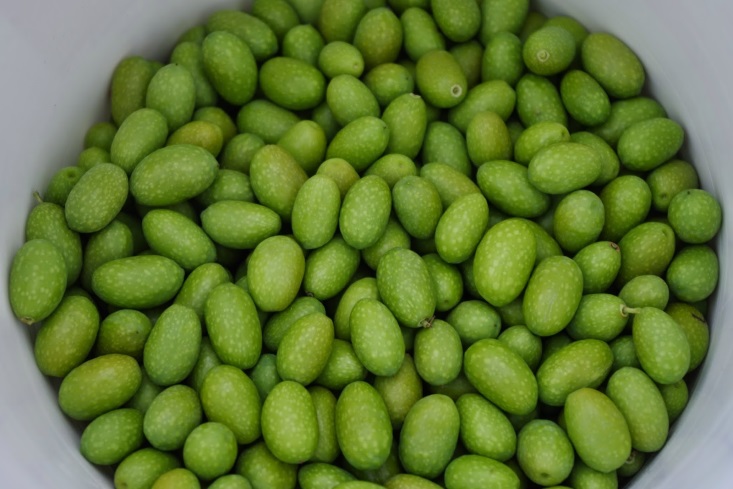
I’ve never harvested the olives grown here, but I noticed the local birds had started eating the fruit so after about half an hours work I had a tub full of almost 2kg (4.4 pounds) of fruit and there were still plenty left on the trees. The recently planted olive trees are years away from producing any fruit, but I’m starting to get very excited by the potential of the olive trees. As at the time of writing this I hadn’t commenced the salting process, but will over the next couple of days, so it should be interesting to see how it all turns out.
 |
| Some of the olive fruit picked this afternoon |
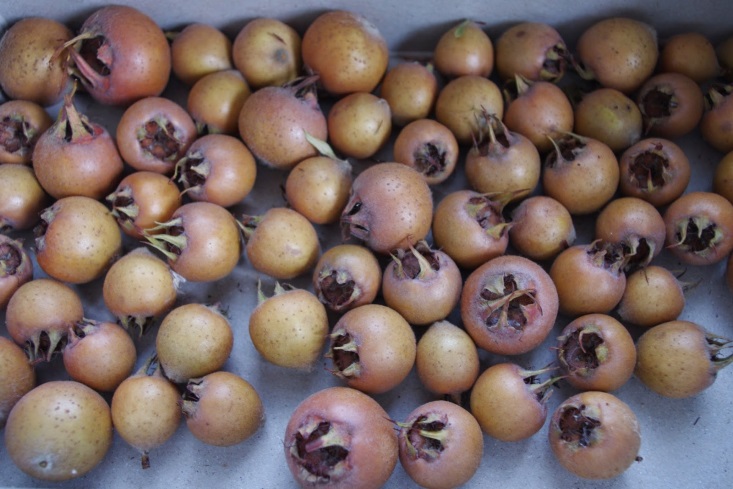
As the other fruit trees have mostly turned deciduous now, I happened to spot a great quantity of medlar fruit hanging off those trees. A couple of nights ago whilst the chickens were roaming around under foot, I picked the medlar fruit. Medlar trees are a very old school fruit tree, but well worth the time. The fruit itself has to soften (it is possibly a fermentation process) before it is edible, but it then has the consistency and taste of a dried date – they are really yummy!
 |
| Some of the medlar fruit drying in the shed |
How did the house get here?
By late May 2010, the plumbers had managed to install all of the steel roof sheets over the house frame. It was quite the achievement because winter was moving in quickly and new roofs are often very slippery. This is because the brand new roof sheets are coated with some sort of oil and if you mix in a bit of rain water to that oil then there is every chance that you will simply slide off the roof. The plumbers were very careful and always wore harnesses.
 |
| The roof sheets have now all been installed over the house just in time for winter |
At that time, all of the beautiful and productive garden beds that you now see were simply not there! What was there was a mess of orangey volcanic loam which I had started to put a bit of woody mulch over. However, before the winter had set in, the plumbers dug all of the trenches for their underground pipes. In the photo below you can see the pipe for the waste water from the house which is gravity fed into the worm farm sewage system (which was in place at the time).
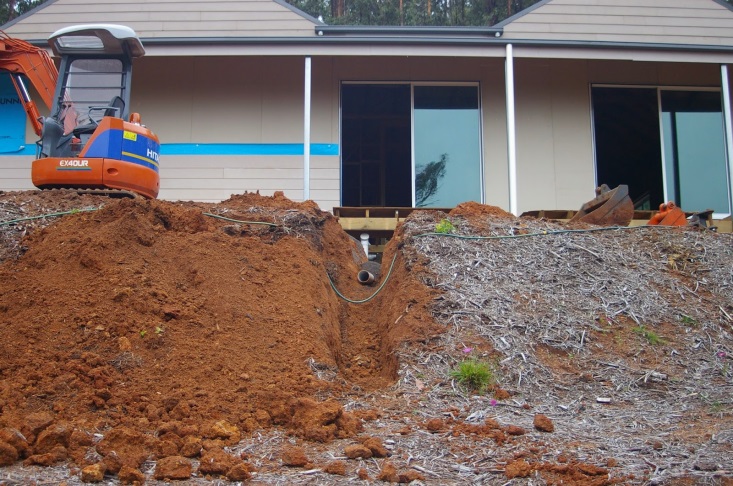 |
| The plumbers dig the trench for the waste water pipe which is gravity fed into the worm farm sewage system |
Very observant readers may notice in the photo above the very sad looking nasturtium plant next to the top of the trench. Also you may note that I had begun cladding the walls with fibre cement (i.e. non-combustible) weatherboards over the top of the blue fire retardant moisture barrier. The weatherboards joined into an aluminium channel in the windows providing an excellent weather seal.
For some strange reason, the building surveyors had decided that the house was being built in an area subject to cyclones! This was a bit of a mystery which annoyed me at the time, but given that the house has actually been directly hit by a tornado one Christmas day a few years back, I guess that there was some sort of prescience so I must not complain. They must have known in advance that something nasty was going to occur!
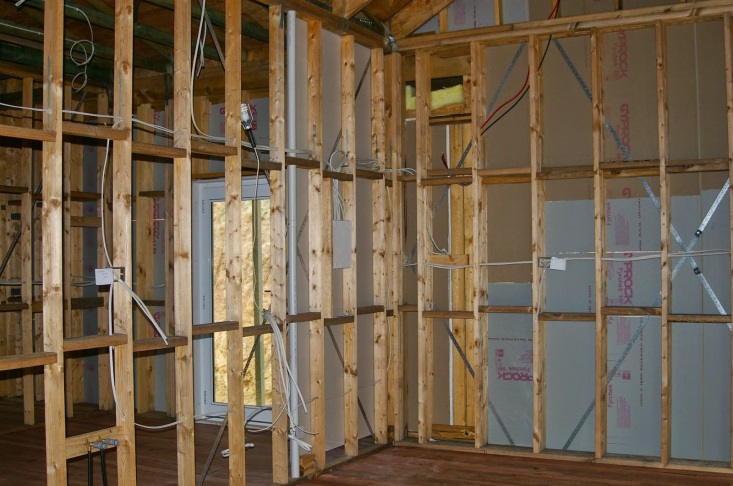
It is interesting to see how the entire house is held together by a whole lot of steel and timber:
 |
| Details of the house construction showing how all of the various elements are tied together |
In the photo above, it is easy to see that each roof beam (the fancy name is a roof truss) is attached to the wall frames by a steel cyclone strap. That cyclone straps hold the roof beam firmly down and onto the wall frames and they do this feat through countless nails. But in addition to those straps, there are very strong X braces (the fancy name is speed braces) holding the individual roof beams into place and these braces also tye the roof beams down onto the wall frames. In the background and looking through the wall frame you can see that there are also steel X braces which are tensioned stopping the wall frame from moving and tyeing the wall frame to the ground. And as if that was not enough, structural plywood was also specified to be installed at various points on the wall frame! The structural plywood forms a very stiff frame and again stops the walls from moving – anywhere. The massive chunky bit of timber above the window is known as a lintel and the purpose of that bit of timber is to stop the roof sagging above the window. As I had two external wall frames, the strength of those bits of timber are far greater than the engineer even considered, but that is life.
After quite a few years of occupancy, the house has not moved, at all, not even 1mm (1/25th of an inch)!
The temperature outside here at about 8.00pm is 5.3 degrees Celsius (41.5’F). So far this year there has been 209.4mm (8.2 inches) of rainfall which is up from last week’s total of 189.2mm (7.4 inches).
Posted by Cherokee Organics at 20:43 ![]()
27 April 2015
A water shed moment
Having an eagles eye view across the valley to Mount Bullengarook and also to Mount Blackwood, means that sometimes you get to see some very strange clouds moving across the valley. Earlier this week the clouds did a great impersonation of the mothership which was clearly about to land in the valley after a long voyage across space:
 |
| The mothership descends into the valley |
And land in the valley that cloud certainly did! Fortunately I didn’t spot any aliens exiting the mothership, but it is perhaps good advice not to go looking for them in the first place as they seem like bad news. Anyway, with the thick cloud, visibility was down to only a few metres (feet) and it stayed like that for many days.
The chickens are a mostly hardy lot and they didn’t let a little bit of thick cloud upset their fun which usually involves digging up the plants in the orchard!
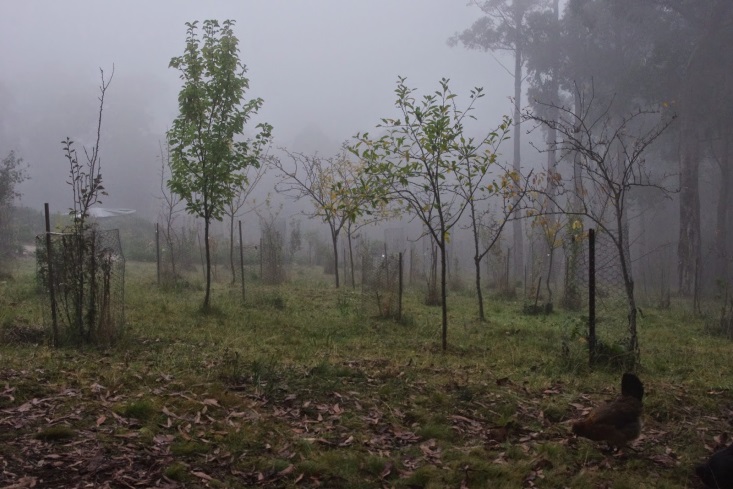 |
| The enforcer chicken braves the thick cloud for a peck in the orchard |
Observant readers will note that I described the chickens here as a mostly hardy lot. The reason for the use of the word “mostly” was because one of the Australorp chickens died suddenly this week. She was healthy one morning and then very dead the following morning. I’d suggest that the sudden change to very cool and damp conditions here brought on some sort of illness. Sudden changes in temperatures can produce shock in farm animals and sometimes that shock can be fatal.
Over the next few months, I’m considering rebuilding the chicken enclosure and chicken hut. Lewis has suggested that it may be a Taj Mahal in the making, but I’m thinking that it will be something closer to a Chookingham Palace! The current chicken housing arrangements are quite unsatisfactory for a few reasons, least of all being that the enclosure which the ladies spend most of their time in, is actually built upside down and on a slope. It will be quite interesting to be able to implement what I’ve learned about chickens over many years and I’ll include some preliminary designs on the blog over the next few weeks. I’d certainly be very interested to hear from everyone about what works and what doesn’t work with their own chicken enclosures, so feel free to discuss all things chicken enclosures.
The weird thing about the thick cloud here was that for quite a few days, if you ignored the constant mist and the fact that the solar PV produced next to no power, it was actually quite dry and OK to work outside. So, excavations for the new wood shed site continued and are now complete for that stage of the project.
When you excavate anywhere here, you never quite know what you’ll find in the ground. There can be giant rocks happily floating (seriously) through the clay and loam and they’re like the iceberg that finished off the unsinkable ship – The Titanic, because you’ll never know just how big they can be below ground level. And usually, they are exactly where you want to dig! This area has also had forests for millennia so there can be old tree roots or stumps underground in various states of decomposition and you’d never even know it.
To get a flat site for the new wood shed, I’ve had to dig at least 2 metres (78.7 inches) deep at the deepest point of the excavations. And wouldn’t you know it? An old and very large tree stump was sitting in the ground just waiting to be uncovered, just where I wanted to dig. I removed that tree stump by digging around it and axing off any side roots – some of which were enormous – and then cutting the tap root with the chainsaw.
 |
| Old tree stump uncovered in the excavation area |
That one stump took about half a day of work to remove and I’m very happy to say that after that, the rest of the excavations went very quickly.
The final corner post for the new wood shed was then able to be cemented into the ground – and then all was good with the world and I went off and had a celebratory mead!
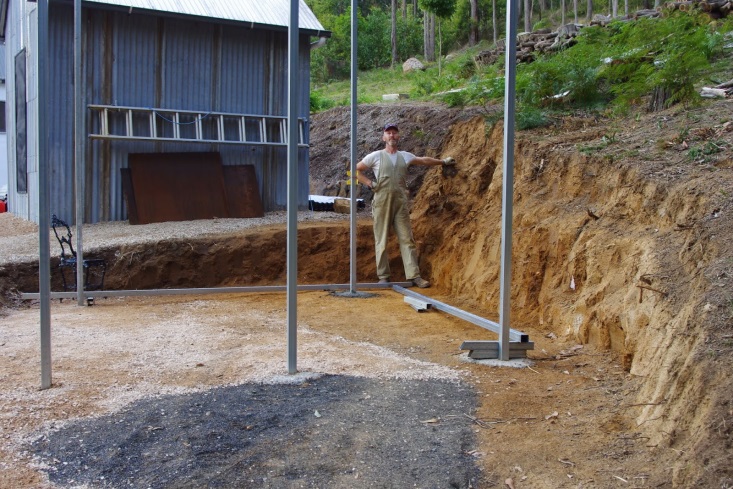 |
| The final corner post was cemented into the ground |
Unlike timber, there is little room for error with steel, so I had to ensure that the final dimensions of the shed were perfectly square and all of the faces of the steel posts exactly lined up to each other.
As of this afternoon, all of the posts have now been cemented into the ground. The height of the roof has been set at 2,300mm (90.5 inches). That height was itself governed by the height of the water tank that will eventually collect all of the rainfall that falls onto the shed roof. It is a funny process building a shed this way, because you have to understand every single step of the process before you can even begin construction.
 |
| All of the posts for the new wood shed have now been cemented into the ground and the height for the roof has been set |
Hopefully, if the weather holds this week, I’ll be able to install the roof and begin cladding the frame.
Autumn has truly taken hold here and over the past few weeks the tourists have descended on the mountain range to witness the change in leaf colour. The maples produce some spectacular colours and some of my favourites are the Japanese maples and below is a photo of one of the many Japanese maples here which has had a particularly nice colour change this week:
 |
| Japanese maples produce an awesome autumn colour display |
How did the house get here?
With the roof now installed, by July 2010, I started installing the underfloor insulation and the very beautiful Sydney Blue Gum flooring. The flooring is actually a species of red gum and even today the floor has this sort of wild “red head” feel to it! To add to the interest, the timber was a downgraded timber, which is what the timber supply people call feature grade. Being classed as a feature grade the floor has a whole lot of visual interest, but is much cheaper to purchase than higher grades. I also strove very hard to increase the visuals of the floor by off-setting the very dark (which are the older timbers) with the very light timbers (which are from much younger trees).
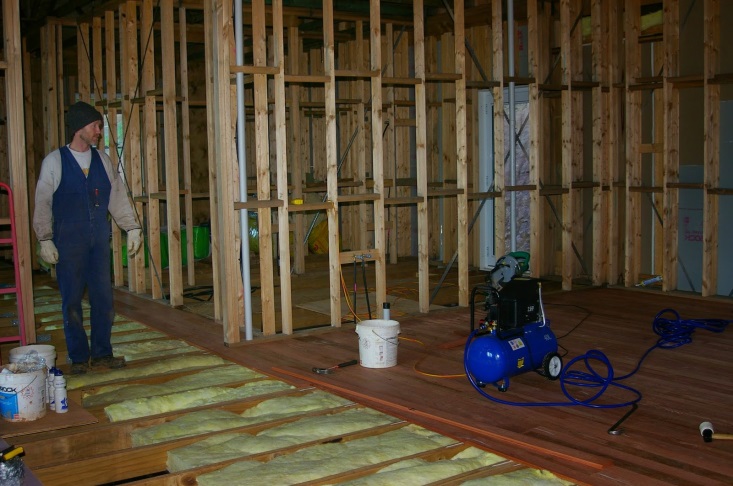 |
| The underfloor insulation is installed at the same time as the timber floorboards |
The fibro-cement weatherboards were also installed that month and although the boards themselves were individually quite high at 230mm (9 inches) each, I provided a lot of overlap between the the boards so that the house looked as though it was a traditional weatherboard house, instead of a cabin park trailer. I actually had to sneak around some of the older suburbs in Melbourne at night with a tape measure to get a feel for what sort of measurements the older weatherboard houses actually had. Fortunately I was not caught in that act as it would have been very hard to explain!
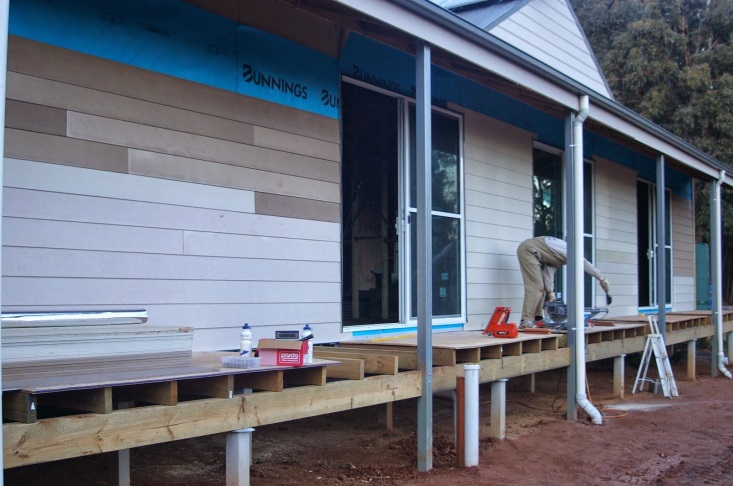 |
| The external fibro cement weatherboards are being installed |
And then one day that month all of the flooring in the house had been installed.
 |
| All of the floorboards were finally installed in the house |
The batteries which store all of the electrical energy for the house were connected up to the inverter at that time too. The inverter is an amazing bit of locally manufactured equipment that takes the 24V DC of the house batteries and converts it to the sort of mains power that you’d expect to find in a normal house. It works so well, most people have no idea that the house itself is not even connected to the electrical grid!
 |
| The inverter is now connected up to the house batteries |
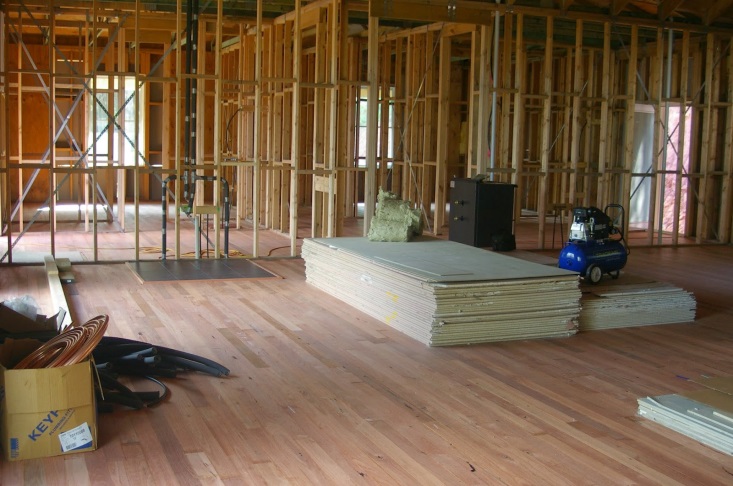
The electrician then could begin the exceptionally complex task of running electrical cables all around the house frame:
 |
| The electrician began the complex task of running wires through the house frame |
To be continued…
The temperature outside here at about 9.00pm is 7.2 degrees Celsius (45’F). So far this year there has been 224.0mm (8.8 inches) of rainfall which is up from last week’s total of 209.4mm (8.2 inches).
Posted by Cherokee Organics at 21:10