Monday, 30 March 2015
Watching the detectives
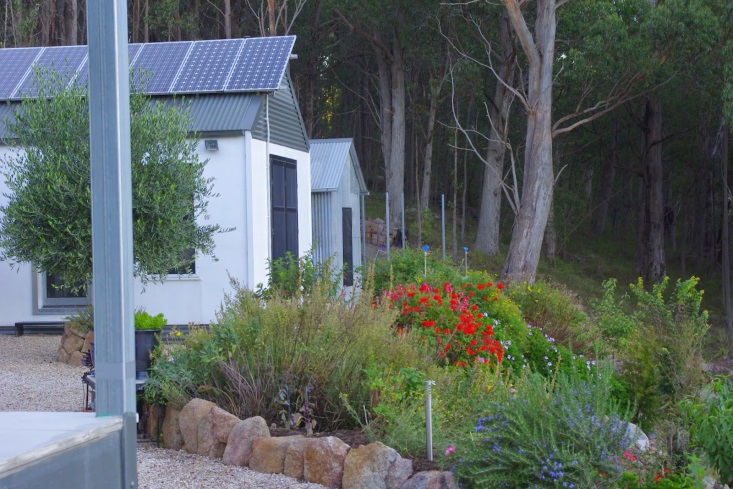
Scritchy, the miniature fox terrier, who is the boss dog here, has both some good and bad qualities. One of the good qualities is that she can obsessively hunt rodents. Whereas it would take me days of observation to work out where rats were living, she can just have a sniff around the place and tell me: Here they are human boss! Scritchy is in fact, a rat detective. And so this week she has found where the rats are living near the house and informed me of her find. The rats are living in a storm water drain next to the house.
 |
| Scritchy lets me know that the rats are living in a storm water drain next to the house |
The dogs here are well fed and don’t seem to enjoy the taste of rat, as this week they have presented me with one dead rat carcass – which was promptly put into the worm farm compost system. Top work guys! Along with the kitchen scraps, grey and black water, that rat carcass will go towards enriching the soil and feeding the wildlife. A nice end (for now, anyway) to that tale (tail!!) and hopefully, the rats will think twice before eating my car again.
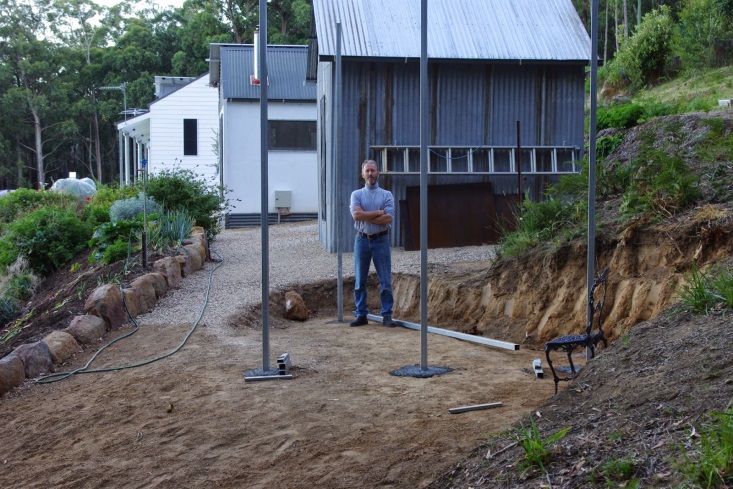
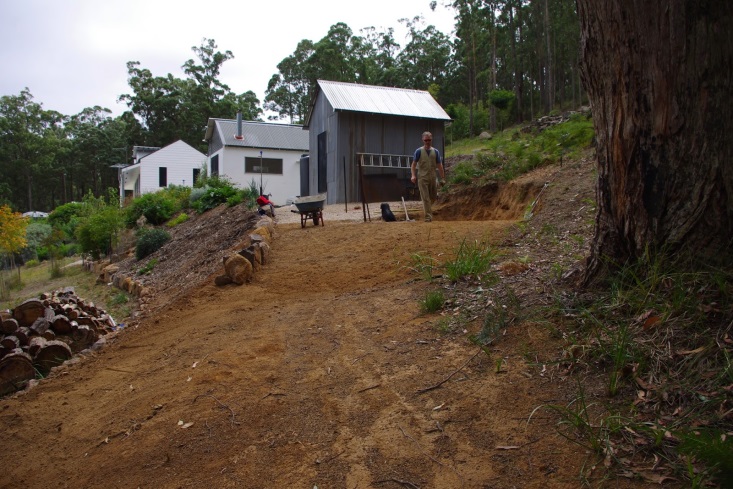
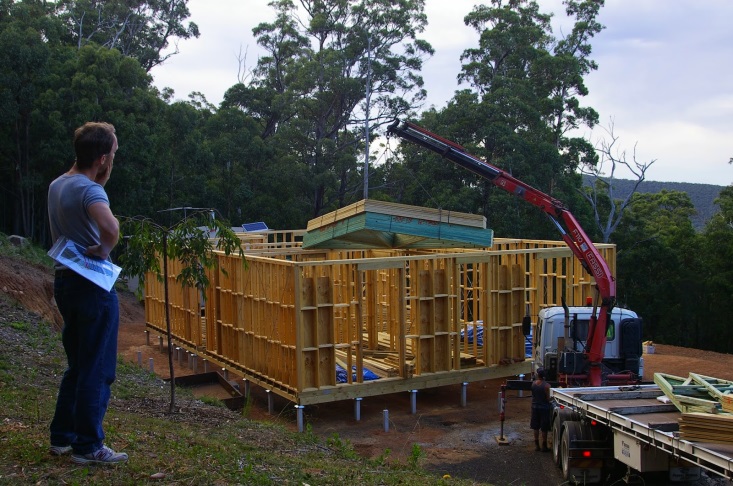
Construction of the new wood shed commenced and there are now 4 steel posts cemented into the ground with a further 5 steel posts yet to be installed. The photo below puts the steel posts for the new wood shed into context with the other sheds. The trees behind the new wood shed are quite large, but really, they’re still babies especially when compared to some of the other trees on the farm. The big tree closest to the new wood shed will be up lit at night, so it should look quite interesting when completed – hopefully by the end of April. I am yet to track down a supplier of the second hand galvanised corrugated iron which I’m hoping to use on the new wood shed, so any local suggestions would be appreciated.
 |
| Construction on the new wood shed has commenced |
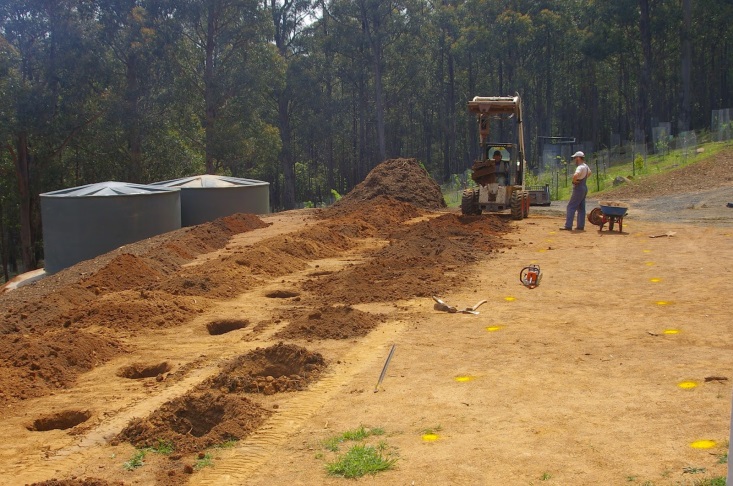
Excavations continued on that new wood shed site too. Excavating, levelling that site and moving the soil by hand is physically quite a hard job, so I’ve been doing a half a day’s work on those activities in the cool of the mornings and then other activities in the sunny and warm afternoons. At a guess, I reckon that there are probably about 3 more days of digging soil before I’m able to have all of the steel posts cemented into the ground for the new wood shed. Three days is really just a guess, because it all depends on whether I find any rocks or old tree stumps hidden in the ground as they can both take quite a while to remove.
 |
| Excavations and levelling for the new wood shed continued |
Very observant readers will note that the steel posts for the new wood shed are on an entirely different angle to the house and the existing sheds – and they’d be correct! The new wood shed is actually parallel to the rock wall.
In the photo above, you can see that with the excavations I have tried to build an almost flat and level site. The reason for such neatness, is not because I appreciate neatness, although that is a worthy goal, but because firewood weighs quite a lot and if that mass becomes unbalanced, the whole lot can place quite a strain on the structure of any shed and possibly even push a shed over. I have seen many firewood sheds around this area that are on some very unusual angles – which I suspect is due to the sheer weight of all the firewood inside of those sheds!
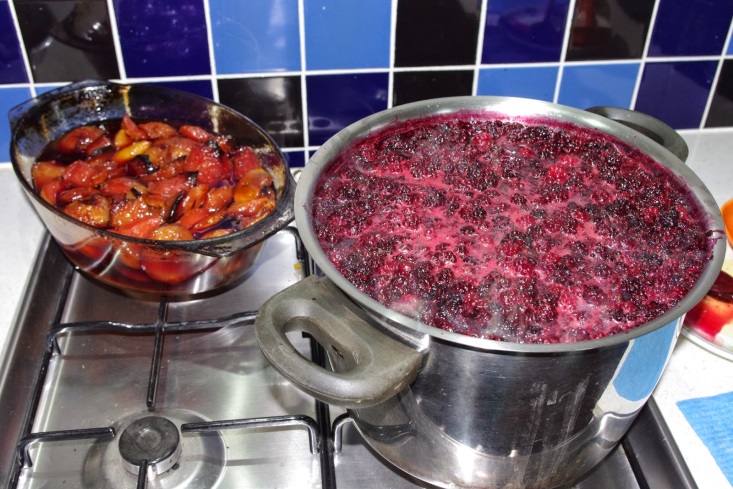
Earlier in the week the weather was quite cool and moist outside, so I abandoned the new wood shed project and instead had a monster cook up. How good are cook ups? The apple cider vinegar that had been bubbling away in a bucket in the laundry for months was finally poured (the technical term for those so inclined is called: racking out) into wine bottles. Word up too, to my good Kiwi friends who have kept me supplied with used wine bottles over many years and without which I could not indulge in all of this wine and cider making activity. Respect!
The frozen blackberries were also taken out of the freezer (there was seriously no more space in there!) and turned into blackberry jam:
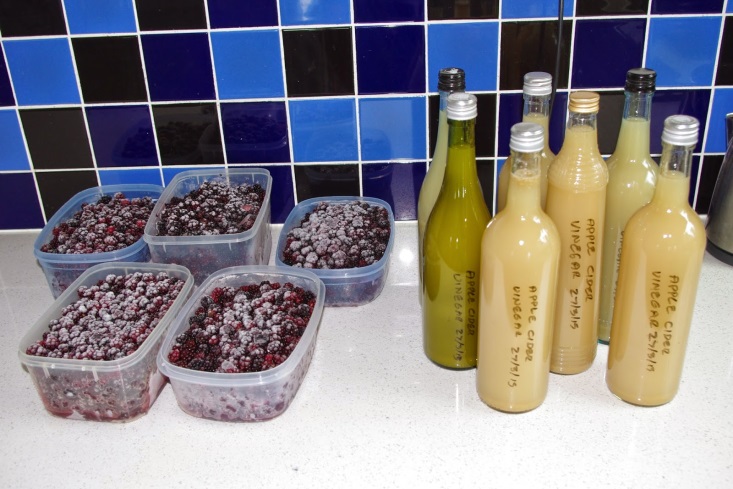 |
| Apple cider vinegar is racked out and the frozen blackberries prepare for a jam |
The cooler weather meant that the repaired wood stove was fired up and seriously, there is no point wasting any of that heat. The fire box heats both the house and the hot water supply, but it also has an oven so I set about using that heat to slow cook some poached quinces. The poached quince recipe not only produces very yummy candied poached quinces for my breakfast, but at the same time it yields a couple of jars of quince jam – which is seriously good stuff on freshly baked bread. If I was down with the kids, I’d say: It’s the bomb – whatever that means!
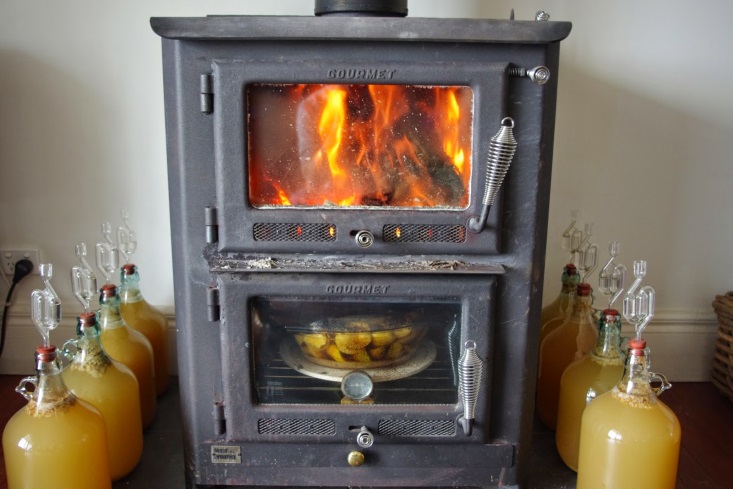 |
| The repaired wood stove is used to cook some poached quinces and keep the demijohns bubbling away |
The heat from the firebox is also used to keep the 8 x 5 litre (1.32 gallons) demijohns happily bubbling away producing: ginger wine; mead; and lemon wine. They are all very easy mixes to make and reasonably consistent. Those demijohns next to the fire box will be racked out (which as you now know means poured into wine bottles) over the next few weeks and then new batches will be started in those same demijohns. Those wine bottles will then sit and age for more than 10 months before being consumed.
Whilst all of that was going on, the blackberry jam slowly boiled away on the stove top and over a few hours, those blackberries all turned into jam. I’ve now completely run out of jam jars, but other than quince, I won’t be making more jam until about Christmas.
 |
| Blackberries are slowly turned into jam. The poached quinces are in the background slowly cooling down |
In the photo above you can also see the poached quinces sitting in quince jam. That quince jam has to be drained from the mix before the whole lot cools down otherwise the poached quinces will set into the jam which incidentally would taste nice, but it is possibly not the outcome that I was looking for!
With the weather turning cooler – and the new wood shed not yet complete – I’ve filled up the remaining firewood bay with firewood that has seasoned for 24 months and that should be plenty of firewood to keep me going right through autumn into early winter. July and August are the cold months here and that is when firewood is really needed.
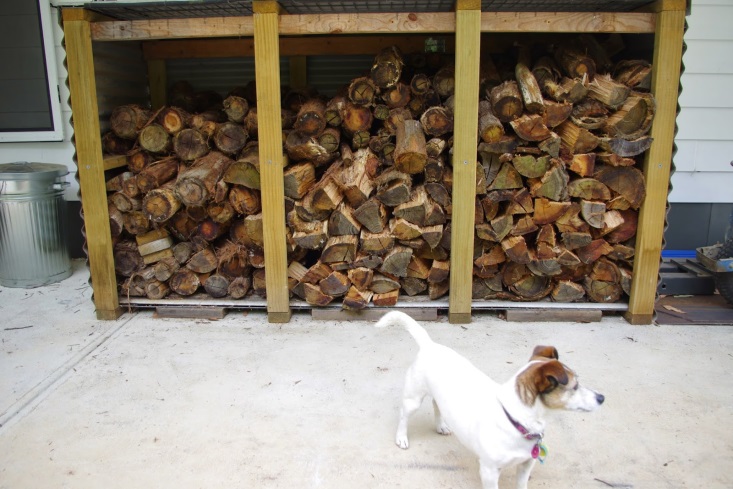 |
| Scritchy approves of the full firewood bay for her winter heating requirements |
How did I get here?
Over the past 10 months I have regularly fielded a few of the same questions from people who are curious about my life. So, below are a few questions which are regularly posted in the comments and some answers:
Qu: Do you ever sleep?
– Thanks for your concern. I actually sleep quite well most nights, but usually I require a lot of sleep and have been told that I am grumpy in the mornings. I honestly do not know what this means though!
Qu: How do you achieve so much every week?
– Well, I’ve sort of operated at this pace for over two decades now and probably don’t know any better. It is worthwhile noting that I had to move out of home once I completed high school and that meant working full time in order to support myself. In addition to that I studied an undergraduate and postgraduate degree part time over many, many years. It did take a while. In addition to that I kept up friendships, dated many young ladies before eventually marrying my lovely editor. Over the years that has meant juggling many different activities all at once. Occasionally, I have had 10 different activities on the go at once and 8 of them actually worked out – we won’t speak of the 2 that didn’t though! Needless to say that I employ lists so that I can forget about all the different activities going on and focus on the task at hand. Nowadays, I only have a couple of activities on the go at the same time, so the pace of activities feels (usually) pretty relaxed to me nowadays.
Qu: How did you learn how to build?
– As a young lad, I attended a very strange high school that employed some unusual hippy dippy ideas but did actually teach metalwork and woodwork classes. Something must have stuck in my brain because when I became an adult I tended to purchase complete dumps of houses and then fix them up. I moved into this house here when there were no lights and the walls were not even completely sealed to the outside environment. To be truly honest it was a bit cold. I learned how buildings where constructed by trial and error, reading books, working out what the old timers used to do and also nosing around building sites after hours seeing what current builders do. Many times I’ve had to face building industry professionals going over my work and it was like sitting an exam where you have no idea what the content will be and usually they were very positive about my work. One building surveyor went so far as to ask why there were no cracks in the plaster work (drywall) after a few years of habitation.
Qu: What do you do for money?
– I am an accountant. I work for many different small businesses providing taxation, bookkeeping and business advice services. I haven’t always worked for small business and for many years I worked in big business, eventually as a financial controller. However, I love working for small business and very few accountants anywhere provide a similar service.
Qu: How often do you work?
– I generally work between two and three days per week as an accountant. I then try to have one day off per week whilst the rest of the time I work on the farm here. It is quite a good balance between all of the different activities.
The temperature outside here at about 8.30pm is 12.1 degrees Celsius (53.8’F). So far this year there has been 162.6mm (6.4 inches) of rainfall which is up from last week’s total of 144.8mm (5.7 inches).
Monday, 23 March 2015
Last week, a desire to see the sea came over me and with that desire there were thoughts of heading off to my favourite coastal escape of Apollo Bay. That part of the world is not far from here as the crow flies, but it is a couple of hours drive because the roads are so twisty. The car which is normally very reliable started playing up the day before. To my absolute horror, I’d found that a rat (or a couple of rats) had decided that the engine bay of the car would make a toasty warm place to nest on cool nights.
Who would have thought that rats could actually eat vehicles? I was completely surprised by this discovery. The rats mostly chewed through hoses – some of which were hydraulic hoses (I’ll bet that gave them a surprise when they leaked!), and a whole lot of wires – including the control wires for the fuel injectors. Sorting the mess out has cost me about half a week’s income. Well done them!
Rats and repairs aside, I made the journey to Apollo Bay and had a lovely time. Peak holiday season has passed so the town is a bit quieter than it would be in high summer. It is a beautiful part of the world and the Otway mountain range extends right to the shore line. I took this photo of the beach at low tide:
 |
| Apollo bay at low tide |
Because I don’t really travel much these days, it was particularly interesting to note changes from my last visit to the area. The high tide mark can be clearly seen in the photo due to the wet sand and it is almost reaching the vegetation at some points. Storm surges have also cut into the dune and there is a very obvious cliff on the dune in the photo above. It should be noted that there is only a single narrow dune between the ocean and the road and beyond.
The Otway mountain range which rises up behind the town and also right along that coast line peaks at an elevation of about 500m (1,640ft) above sea level. That elevation doesn’t sound like much, but given that there is really not a whole lot of land between the Otway mountain range and South America, the winds off the Southern Ocean dump a massive amount of rain into the area. In fact, the area contains the wettest location in the state which receives an average of about 2m (6.56 feet) of rain per year.
Like most parts of Australia, the Otway mountain range is quite old and worn down over time. Land slippages in the mountain range do occur and those slippages combined with heavy rain means that there are some very impressive deep valleys. The whole area is very scenic.
 |
| Tree ferns re-establish themselves in a paddock of cleared land just off Wild Dog Road |
This isn’t a travel blog though and I was up in the mountains on a mission. Anyway, tucked away in a remote location high up in the mountain range is the Otway Herb Farm. They have an impressive selection of plants for sale at very reasonable prices. Autumn is planting time here at the farm because the sun is gentle, the soil is warm and the rain occasionally falls from the sky at regular intervals.
As an interesting side note, on my way up to the Otway herb farm, I passed some very organised looking guys in a Mercedes van picking wild fruit on the side of the road. Those guys had boxes of fruit in the back of the van and were accessing all of the hard to pick apples high up in the trees with ladders. Top work guys!
Today, I planted some of the many flowering and herbaceous plants that I purchased at the Otway Herb farm. Sir Scruffy assisted with the planting efforts and he particularly approved of the many interesting varieties of salvias which attract the local honey eater birds:
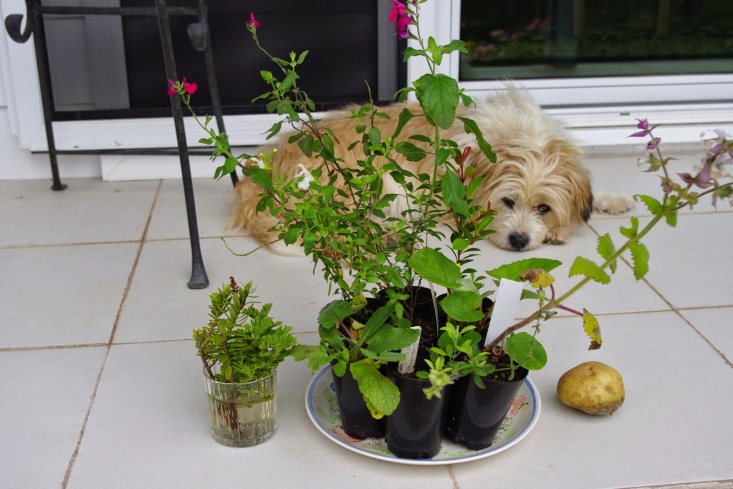 |
| Sir Scruffy keeps a close watch on some of the new plants to go into the ground |
It should also be mentioned that I had long and pleasant conversation with Ken at the Otway Herb Farm. His wife runs the farm, but they have lived in that area for over three decades and he was and absolute mine of information. I mentioned the problems with the rats here and he advised me that it was probably in my interests to poison or trap the rats. I agree with his advice, but would really love to hear from readers of this blog about their experiences with rats, so please feel free to leave a comment with suggestions and tales (not tails!). Thanks!
Rhubarb is a triffid here! No other edible plant here is more reliable – all year around – than rhubarb. I read once that a Tree of heaven survived ground zero of the nuclear blast at Hiroshima only to later regrow: Tree of heaven. I suspect rhubarb may be able to perform a similar feat. Today, I dug up two very old plants which were a gift from a local lady who said that the cuttings originated from her grandfather. The plant grows faster than the rate at which I can eat it. The root system was roughly divided up and then planted about the place:
 |
| Digging up the rhubarb today |
 |
| The rhubarb has been planted in the new garden beds |
The weather has turned cooler here, so this week I’ve draped cloche’s over the cherry tomatoes just to keep them warm and ripening. The plants will happily continue to produce fruit well into June and any green fruit moved inside the kitchen after that time will continue to ripen.
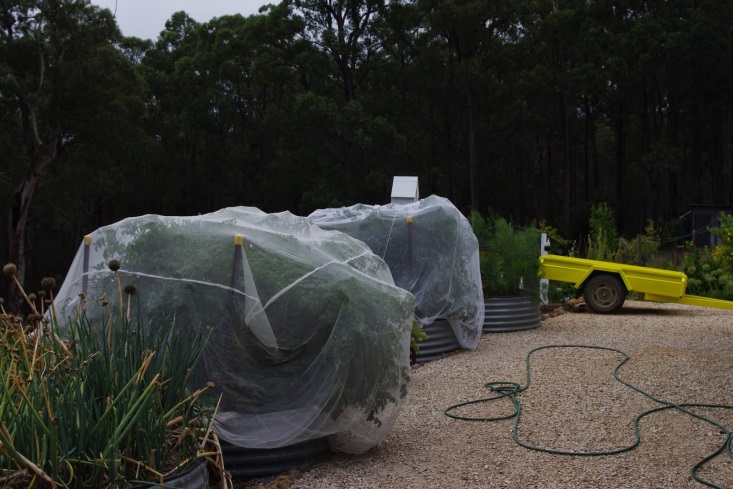 |
| Cloche’s placed over the tomato plants to assist ripening |
The excavations for the new wood shed continued this week. Unfortunately I discovered that the shed had to be moved about 0.5m (or about 1.6ft) further into the side of the hill. That discovery has meant that further excavations now have to occur and there will possibly be between 2 and 3 days more work before shed construction can commence!
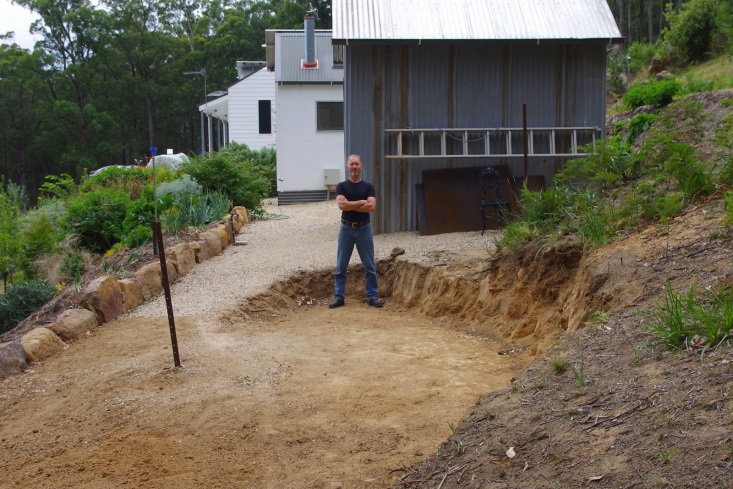 |
| Excavations continued this week |
How did the house get here?
The bones of a house are like your skeleton: they keep you from flopping onto the ground in a gooey mess of stuff.
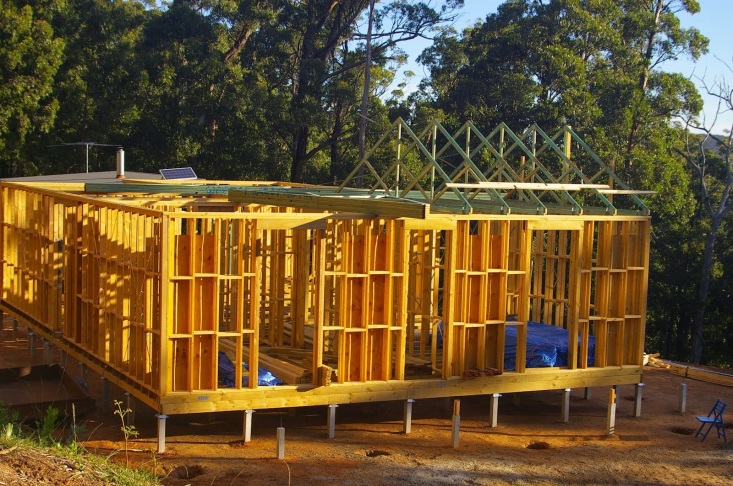
Over the month of February 2010, the roof trusses were mostly installed. A huge amount of steel straps were used to hold the entire structure together so that it became a single unit. For some strange reason, the building surveyors demanded that I build a structure that would withstand the sort of very strong winds that you may see in a cyclone and I decided not to argue the point with them.
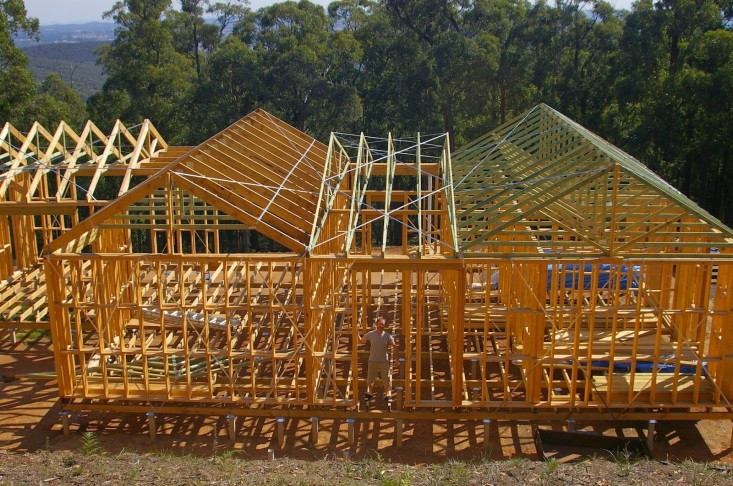 |
| The roof trusses are mostly installed and a whole lot of steel straps tie the entire structure together |
During the month I also installed the windows into the frame of the house. The windows are double glazed which meant two layers of 5mm (0.2 inch) toughened glass each and they ended up costing more than all of the timber in the entire house frame!
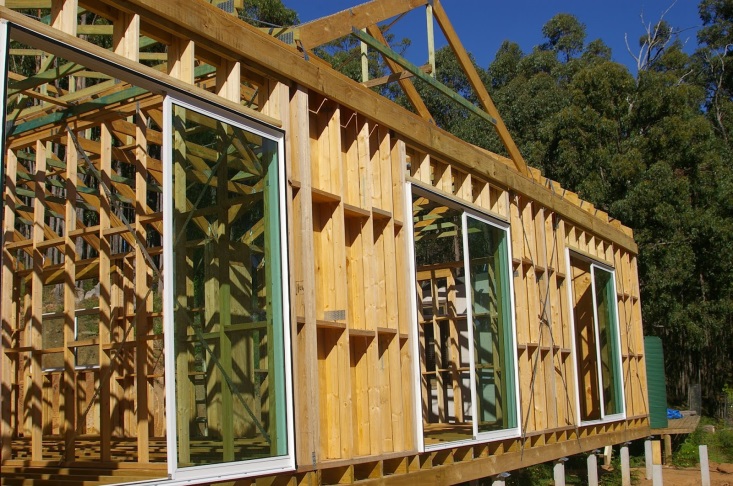 |
| The windows were installed in the house frame |
As well as steel strapping, the engineer required me to install plywood bracing sheets at various positions in the house frame. That was in addition to all of the steel strapping holding everything together. In the photo below you can also see the timber floorboards – NSW Blue Gum – happily keeping out of the rain under some very heavy duty tarpaulins.
 |
| Plywood bracing was also added to the timber wall structure |
To be continued…
The temperature outside here at about 8.30pm is 13.6 degrees Celsius (56.5’F). So far this year there has been 144.8mm (5.7 inches) of rainfall which is up from last week’s total of 138.4mm (5.4 inches).
Posted by Cherokee Organics at 20:35 25 comments: ![]()
Monday, 16 March 2015
The 2008 Australian film “Kenny” was about Kenny the plumber who had possibly one of the most thankless and off-putting occupations imaginable: He specialised in delivering and maintaining portable toilets to well-populated events. The film title was also called Kenny, and you wouldn’t think that a film about a plumber would be funny, but it was highly amusing. Anyway, at one point in the film one of the characters delivers true words of wisdom: “You always burn your first batch of scones”. And you know what? Every time I have to repair something or fix up something here at the farm, those words keep coming back to haunt me time and time again.
The weather has turned cooler and more autumn like this week, and this morning I spotted the first of what will be many frosts in the valley below. The farm is high up on the side of a mountain so it is generally frost free. The reason for this is because cold air is heavy and falls downhill overnight and collects in valleys. There can be quite a few degrees difference between the farm and the cooler valley below. This is an advantage as I can grow all sorts of unusual sub-tropical plants like avocadoes and citrus which grow quite well as long as they can withstand the occasional light frost. Anyway, the frost way down below is beautiful because it washes out all of the colours and the view has a sepia tone:
 |
| Frost in the valley below this morning |
With the weather turning cooler, my thoughts have been drifting towards firewood and the wood heater. I’m not sure whether I’ve previously mentioned it, but the wood heater is the only source of heat in the house during the winter. It is an excellent unit as it has an oven for baking bread and other edible goodies, a stove top for cooking and a wet back for heating the hot water. It is a good unit and is a crucial bit of infrastructure here. However, after only four years of use, the wood heater is starting to break down and that is a real disappointment. The damage to the wood heater is like making your first batch of scones – they’re completely burnt and inedible! Check out the damage to the unit in the photos below:
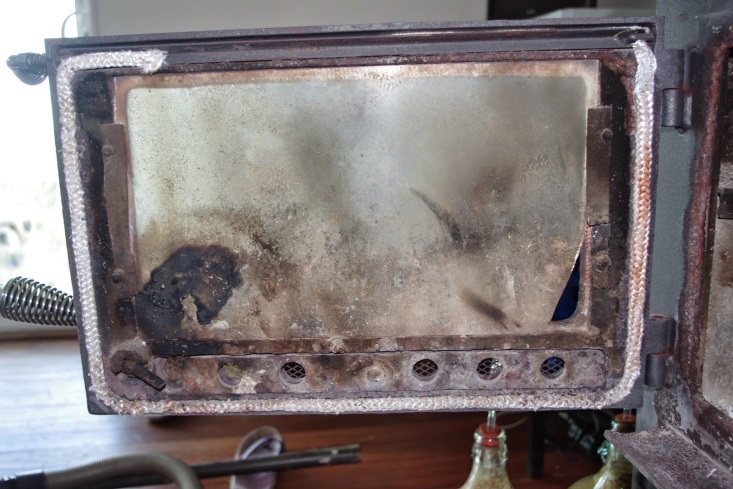 |
| Broken glass and seals in the wood heater viewing window |
The glass – which had already been replaced has broken again. Broken glass means that some smoke escapes the fire chamber into the house, which is not good. Also the broken glass allows more oxygen to enter into the combustion chamber, making it almost impossible to slow the combustion of the fire down and therefore the fire runs very hard and hot and uses far more wood than it otherwise would.
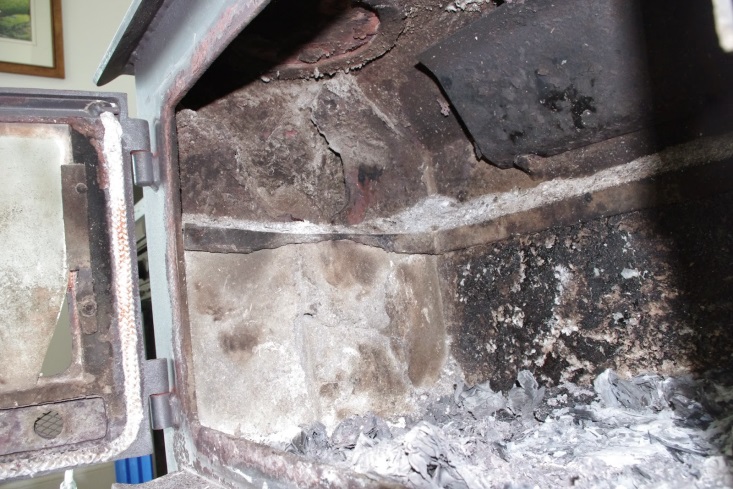 |
| Damage to the inside of the combustion chamber |
The steel inside the combustion chamber on the sides of the unit was reasonably thin (about 2mm or 0.1 inch thick) and not up to the job of containing the extreme temperatures inside the fire box and they were eventually destroyed. The photo above shows that on the side of the fire box, there is a large hole where some steel used to be. You can even see that the fire bricks themselves have broken and that even the bit of steel that held those bricks in place was also in serious danger of completely disappearing without a trace!
So I began the very thankless job of repairing that wood heater. To replace the wood heater with a brand new unit would have consumed my income from a couple of months of work so I took a gamble and have tried to repair the existing unit. The photo below shows me pretending to be happy whilst repairing the seals and glass in the door of the wood heater:
 |
| Repairing the glass and seals in the door to the wood heater |
It is worth mentioning that the glass used in wood heaters costs around $1,000 per square metre (1.2 square yards) Down Under. You can tell if the glazier has sold you the real deal because if you look into the depths of the glass it has a pink hue. Normal glass has a green hue.
Today, I cut some of the leftover 5mm (0.2 inch) plate steel from the stair project and lined the sides of the combustion chamber inside the wood heater. Some of the fire bricks had fallen apart so they also had to be replaced. The bit of steel which holds the fire bricks in place was also replaced. Finally some cement which is rated to withstand temperatures of up to 1,400 degrees Celsius (2,000’F) was added which glues the whole lot together.
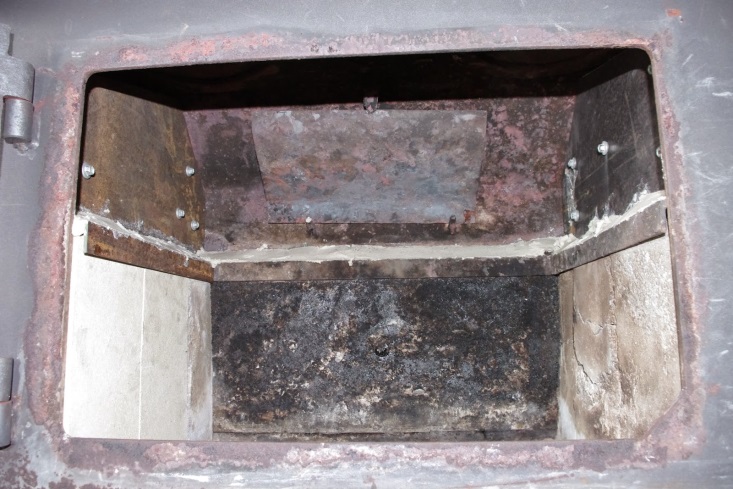 |
| The guts of the wood heater now look almost as good as new |
Hopefully my next batch of scones (i.e. the metaphorical wood heater itself) don’t get burnt! In dismantling the unit, I’ve learned quite a bit about how the thing works and I can now see from hindsight that it was perhaps unwise to allow the height of the combustion to ever go above that of height of the fire bricks. The combustion chamber can hold far more timber than it actually should and henceforth I will be more careful with how much timber I stack into the wood heater.
Speaking of all things wood heater related, the excavations for the new wood shed have also continued this week and I’m now probably only a couple of weeks away from commencing actual construction on the shed itself. In order to save some time, only the actual site for the wood shed is being excavated. The wood shed will then be constructed and after that has been completed, the landscaping, rock walls and garden beds will be finalised.
 |
| Excavations for the new wood shed have continued this week |
I’m always on the hunt for new and interesting flowering plants so that there is a continual supply of pollen and nectar for the bees here. This week, I took a trip up to Blackwood (you can see Mount Blackwood in distance in the frost photo above) to visit some nurseries there that specialise in those sorts of plants. I picked up a few flowering plants and they are now waiting in a garden bed for their final resting spot to become available as a giant rhubarb plant has to be first removed and divided (more on this next week).
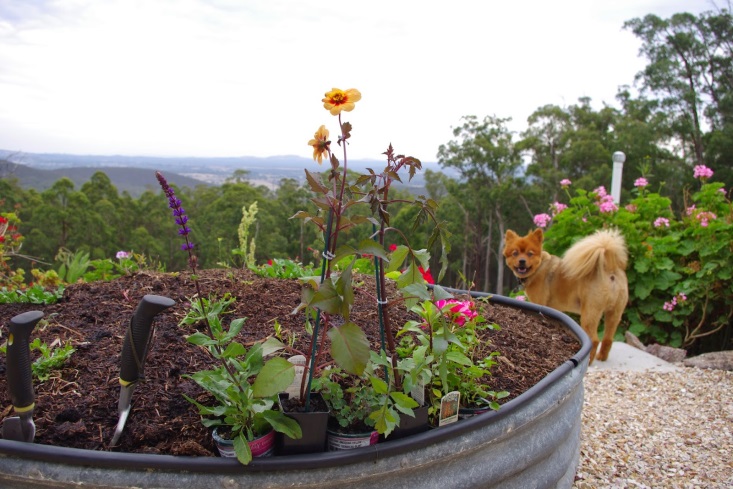 |
| Poopy the Pomeranian looks on with approval at the new autumn flowering plants |
The bees have food all year around here at the farm as there is always a large and growing diverse range of flowering plants. This week is no exception as the Jerusalem artichokes have just begun to flower:
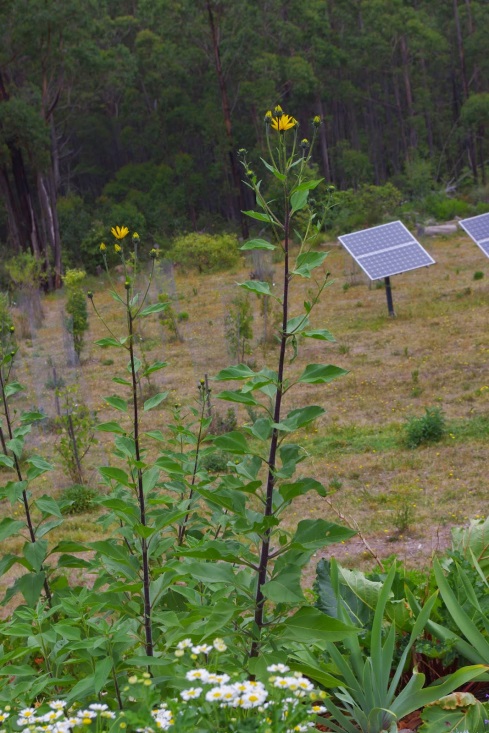 |
| Jerusalem artichokes have only this week begun to produce flowers |
How did the house get here?
I mentioned in the previous blog that the summer of January 2010 was the wettest summer that I can remember. One evening that month whilst in the house that I rented in a nearby housing estate, I received a surprise to find out that the developers had actually built the estate on top of an old creek bed:
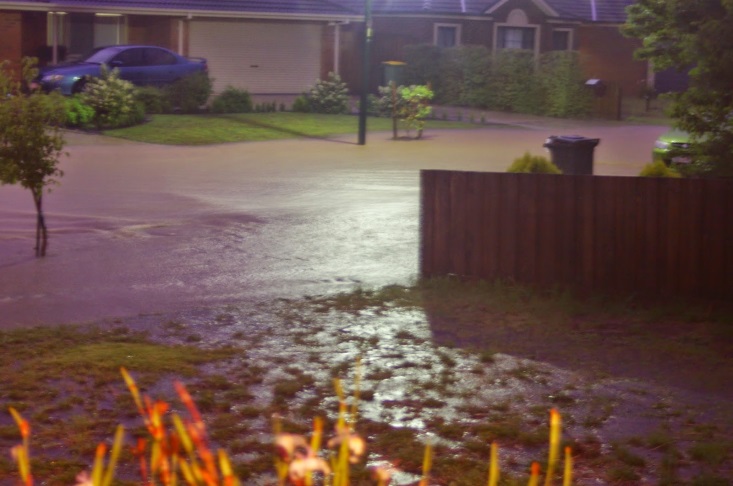 |
| People on the street find out to their surprise that the housing estate was built on an old creek bed |
Even the wildlife was a bit sick of the rain as one day I discovered a wallaby hiding in amongst the various construction materials here:
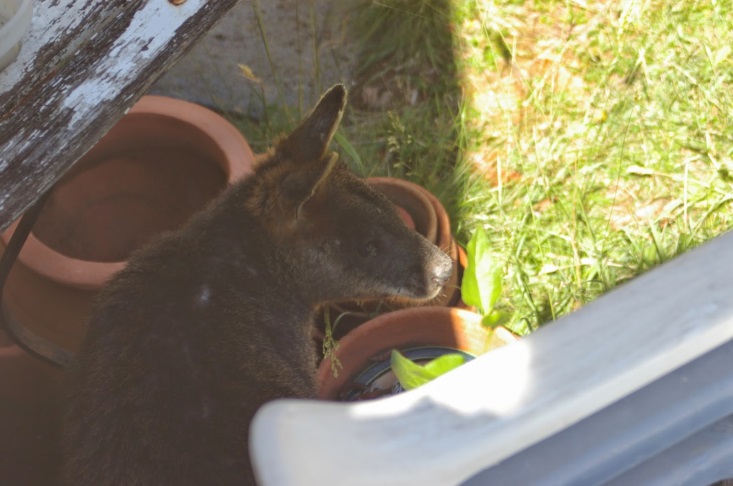 |
| A wallaby is found hiding from the incessant rain of that year |
It was a month of deliveries of materials too and in between the rain, the floor boards arrived and had to be unpacked and carefully stored in the house under heavy tarpaulins to prevent damage from the rain:
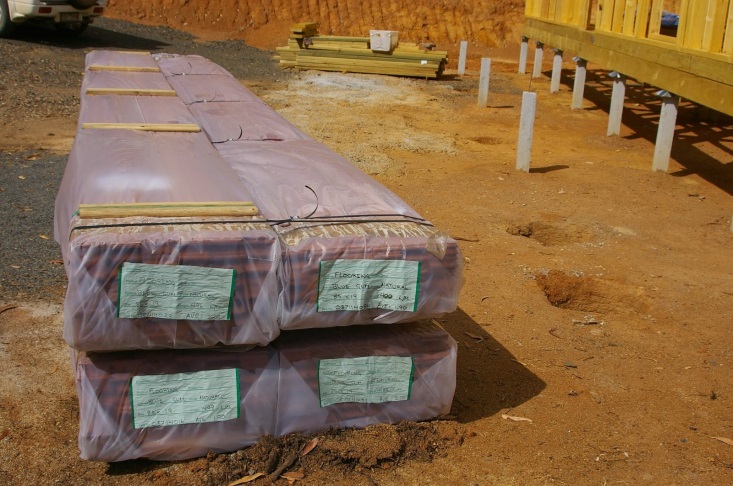 |
| The floor boards arrived on site |
The roof timbers had to be manufactured off site as required by law, even though I could have made them myself, and were also delivered that month. Unfortunately the driver unloaded some of the timber onto the roof which actually should have been put on the ground. Other timber that should have been put on the roof was unloaded onto the ground. An error for the inexperienced! You can see in the photo below, I have the plans in my hand and am scratching my head wondering what is going on…
 |
| The timber roof beams were delivered |
During this month I even managed to get some of the roof timbers installed. Each roof truss is anchored to the wall frame with steel cyclone ties and trust me, they’ve survived the occasional blast of heavy winds – including being tested by a tornado!
 |
| The first of the roof timbers were installed |
The only real problem with the construction was with the water tank which I’d previously mentioned that had rolled down the hill and smashed into a bulldozer. The manufacturers turned up that January and decided in their wisdom that rather than repairing the tank, they’d completely destroy it. It was instructive to see just how hard those things are to get rid of.
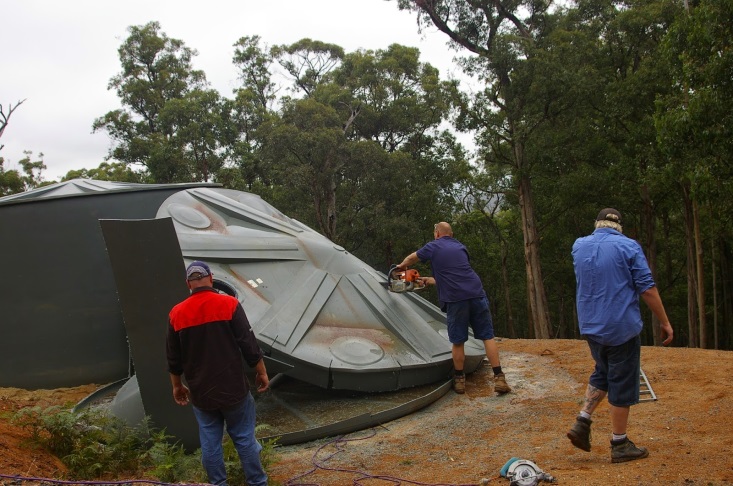 |
| The manufacturer proceeds to demolish the damaged water tank |
To be continued…
The temperature outside here at about 9.00pm is 16.4 degrees Celsius (61.5’F). So far this year there has been 138.4mm (5.4 inches) of rainfall which is up from last week’s total of 135.8mm (5.3 inches).
Posted by Cherokee Organics at 21:01 42 comments: ![]()
Monday, 9 March 2015
As some of you may now be aware, I’m a music fan. I really do enjoy listening to the latest releases even though many of those same releases may challenge my musical palate! In fact, the title of this week’s blog is a nod to the alternative metal band – System of a Down. They rock.
Fortunately for me, down under the government runs the national youth music FM radio station Triple J. It is quite good because not only can you hear that radio station all over the continent, but it also happens to be commercial free, has always been a strong supporter of Australian music and they also stay right on the zeitgeist (and sometimes perhaps a few steps beyond).
Why are discussing radio stations? Well, the farm just happens to be on the one spot on the continent where the FM radio signal is a bit patchy. It is a bit hard keeping on the zeitgeist when it is full of static! So this week, I took the plunge and built a purpose built FM antenna.
A few decades ago, you could simply visit an electronics shop and purchase a specially designed antenna for FM radio reception. Well, try finding one nowadays and you’ll discover that down under these things are very hard to find. And the television antennas that could provide a reasonable substitute have so much plastic incorporated into their construction that I have serious doubts about the longevity of the things.
Well, it had never occurred to me to construct the antenna here from scratch. Fortunately, August Johnson from the Green wizards radio forum website helped me every step of the way. Who would have thought that you could turn a few scraps of aluminium tubing into a full on working antenna? It took a few hours work, but the antenna was soon proudly sailing off the side of the roof here:
 |
| homemade FM antenna proudly helping me to stay on the zeitgeist |
For those that are technically inclined, the antenna is 2.1m (about 7 foot) in length and the widest span is about 1.3m (a bit under 4 foot). The antenna works well.
Now that autumn is here and the weather is cooler, excavations have begun for the new wood shed. It may be a bit ambitious but I’m hoping to have the shed built and full of firewood by sometime around the end of April…
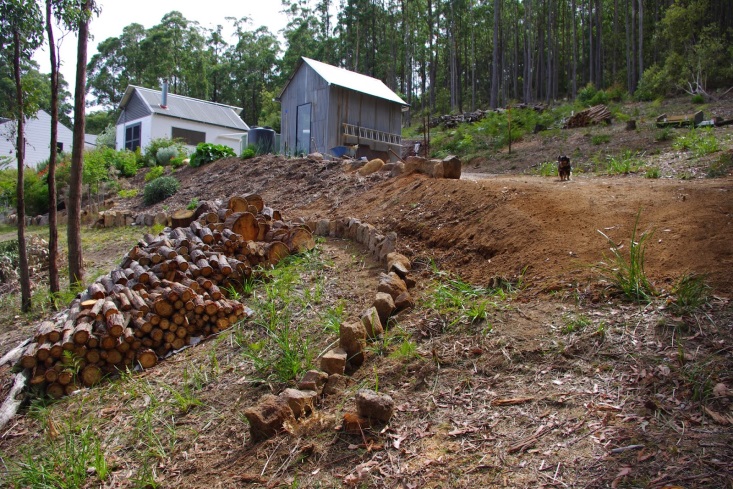 |
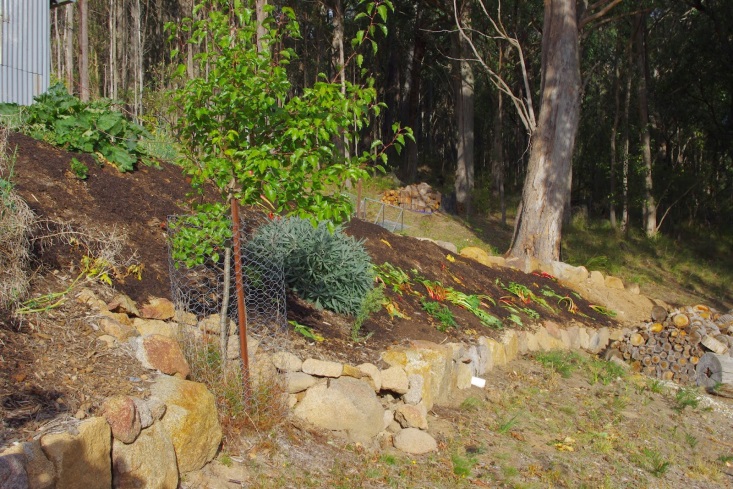
| A new rock wall has been placed so as to receive the excavated soil |
All of that excavated clay has to go somewhere, so I built a new rock wall and will dump the soil against it. Observant readers will see in the photo above the process that I follow here to get a garden bed started from a mound of clay to a completed garden bed. As the garden beds get closer to the house you will see that they are much better established.
It is pretty hard work, so after about half a day’s excavations, the wood shed site is now progressing.
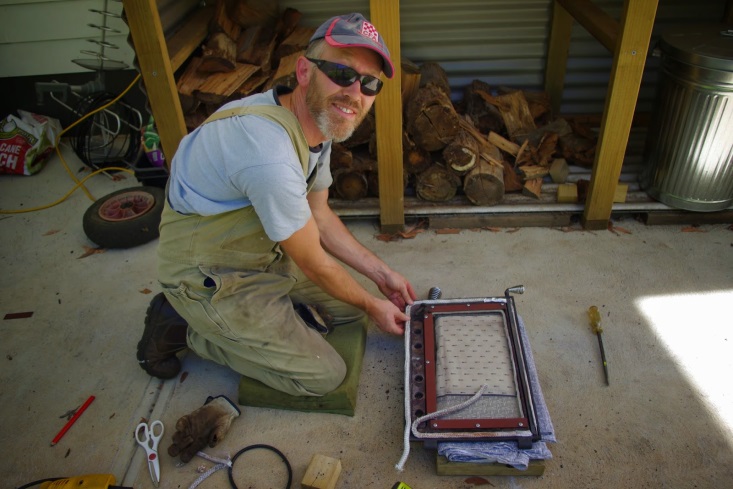
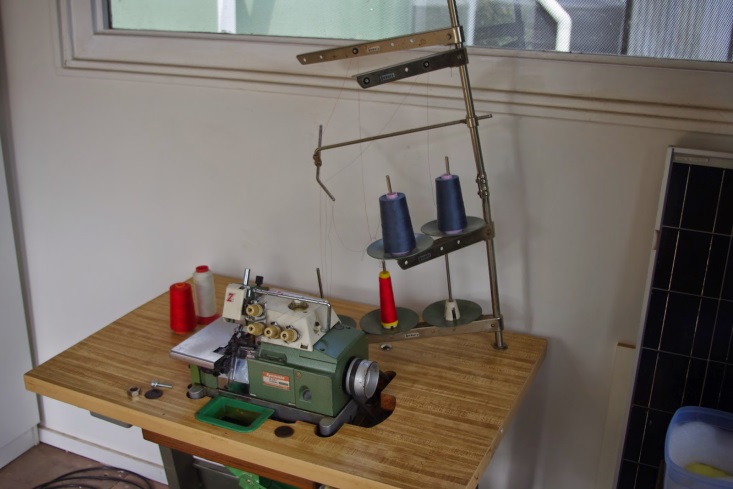
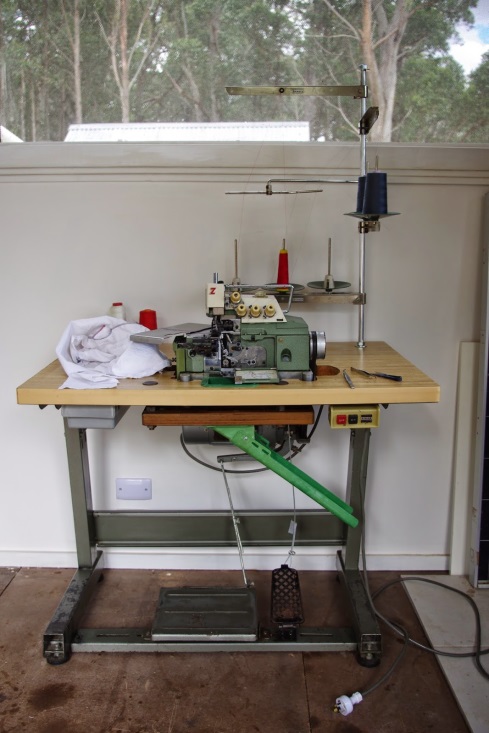
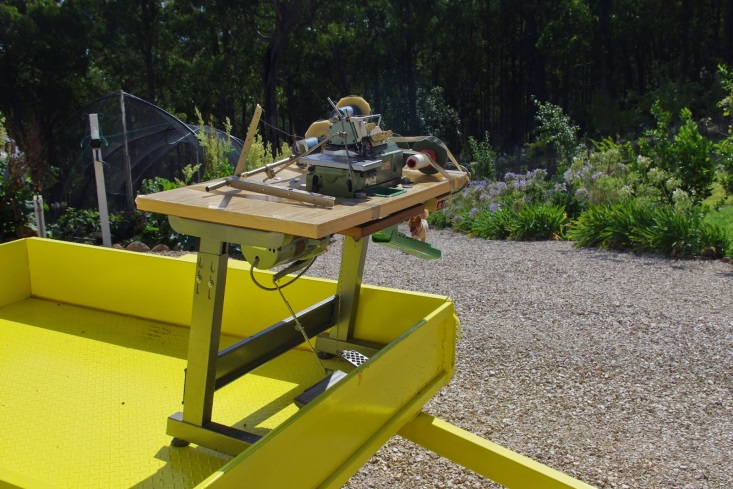
The editor’s birthday overlocker machine scored a makeover this week. The refurbishment involved cleaning, some more cleaning and then there was a little bit more cleaning. Seriously, that machine was one dirty machine (that sounds a bit dodgy doesn’t it?). We used a small 12V air compressor to blow the many years of unidentified rubbish out of all of the nooks and cranny’s inside the guts of the machine. Various nuts and bolts were replaced, whilst others were tightened. Crucial linking cables were replaced with stainless steel wires. The stand that holds the cotton reels and thread separators was also replaced. The mineral oil was topped up. Did I mention that after all that work I still found bits that needed further cleaning? Mate, even my dogs aren’t that dirty!
 |
| Overlocker before the refurbishment |
 |
| Overlocker after the refurbishment |
The machine purrs along now and as a bonus it is a little bit cleaner and sturdier!
Last week, I wrote about abandoning the original ideas for the strawberry beds in favour of the yet to be built strawberry beds above the wood shed. Well, that left a large garden area completely unplanted. That unplanted area had been previously covered with woody mulch 12 months ago just to keep invasive plants out. The woody mulch breaks down into soil, but really requires 2 years before it ends up looking like a black sandy / loamy soil mix.
This unplanted but mulched area is now going to form part of the garden beds, so today I brought in a cubic metre (about a cubic yard) of mushroom compost. The compost was spread around on top of the woody mulch and I planted cuttings and self-seeded plants directly into the mix. Autumn is the time to plant here because the soil is still warm and it gives cuttings time to get settled in before the winter hits.
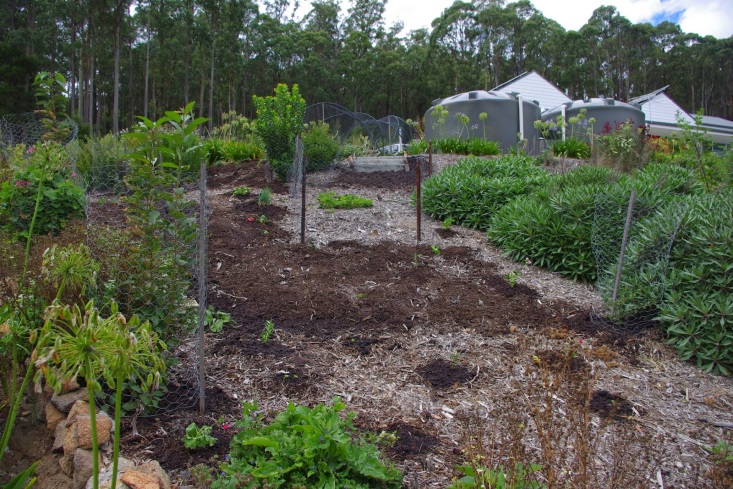 |
| Mushroom compost distributed around with cuttings planted directly into it |
By this time next year, the area should probably look like this:
 |
| Garden after 12 months of growth |
The main plants in the photo above are very hardy plants that establish the area before greater diversity is possible. Those plants include: mints, borage, comfrey, kangaroo apples (solanum family), geraniums, wormwoods, onions, potatoes and a Japanese maple.
After 2 years of growth the garden beds will have even more diversity and should look like this:
 |
| Garden after 24 months of growth |
And I’m repeating that plant pattern over an ever larger area. Once the plants are established the garden beds require very little work to maintain and cuttings from those very established garden beds end up in new areas. There are edible herbs and vegetables spread throughout all of the garden beds too with the occasional fruit tree thrown in for good measure.
How did the house get here?
Towards the end of the year, just as I had all of the concrete stumps which keep the house off the ground installed, it started raining. Actually it rained a lot and the following year (2010) was the wettest in about 140 years of rainfall records. I’ve never seen so much water and over 12 months 1,437mm (56.6 inches) fell from the sky.
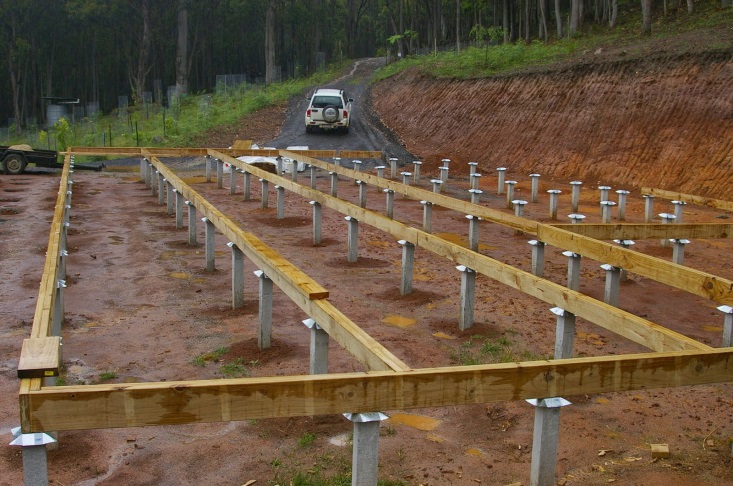 |
| By the end of November, all of the stumps were installed and the timber bearers were mostly in place |
Then one day, all of the supporting timbers were installed. There is a real beauty to the symmetry and order in house construction when everything is (mostly) perfectly lined up just waiting for the next stage.
 |
| The bearers and joists were all installed |
It may be of interest for readers to see what the garden originally looked like at that time – and it ain’t pretty! The photo below also shows the worm farm sewage system sitting out of the ground.
 |
| Lots of red/brown clay everywhere |
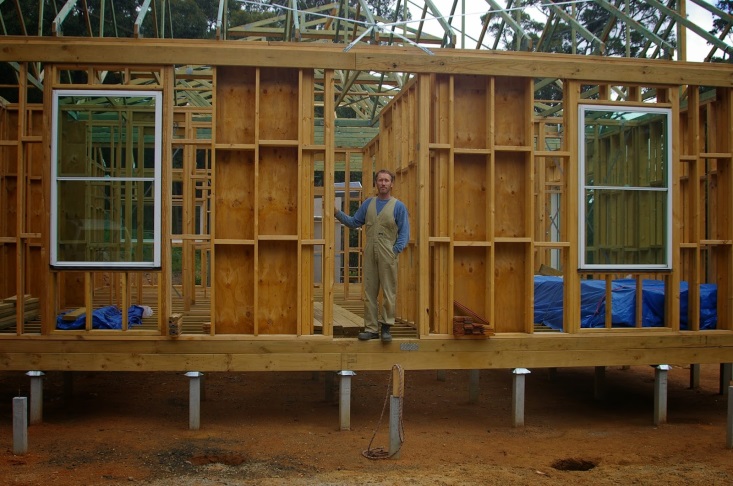
By New Year’s Eve I’d built most of the external and internal wall frames. These were constructed on site and very observant readers will notice that all of the external walls have two wall frames. The reason for the two timber wall frames was so that I could add a thicker insulation batt into the wall cavity. The design for this dual timber wall was based on apartment party (i.e. joining) walls but I do not believe that anyone has used such a system for a household external wall. A standard wall cavity is 90mm (3.5 inches), whereas these walls have a 200mm (7.8 inches) cavity.
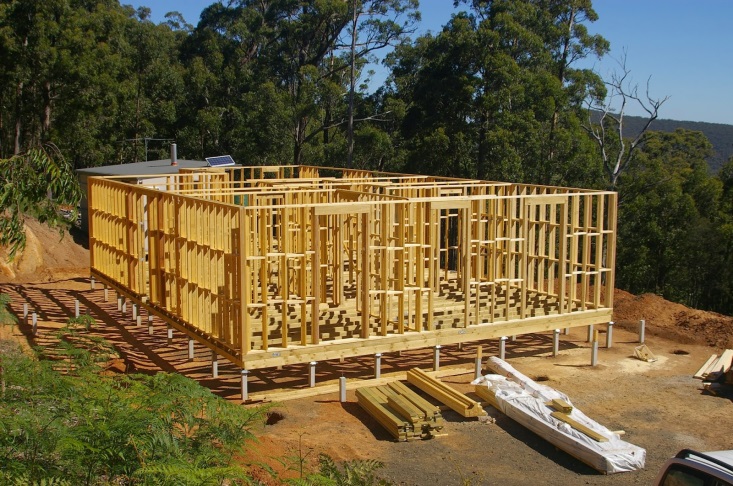 |
| Wall frames completed by New Years Eve |
To be continued…
The temperature outside here at about 6.30pm is 21.6 degrees Celsius (70.9’F). So far this year there has been 135.8mm (5.3 inches) of rainfall which is up from last week’s total of 131.2mm (5.2 inches).
Posted by Cherokee Organics at 18:44 45 comments: ![]()
Monday, 2 March 2015
Stumpy the house wallaby was up to a bit of mischief earlier this week.
I like strawberries and grow plenty of them here. It is an unfortunate fact of life that just about everything else here loves strawberries too. Years ago, I found the dogs in amongst the strawberry plants happily munching away on the choicest strawberries. They were really enjoying themselves. It was at that time that I decided that the entire strawberry bed had to be enclosed, otherwise I would never see a fresh strawberry.
Over the years I have tried various methods of enclosing the strawberry patch and eventually settled on commercial grade black woven bird netting. That netting is strong stuff.
This week however, Stumpy the house wallaby proved that the bird netting wasn’t strong enough. Somehow the naughty wallaby sneaked into the enclosure only to become trapped inside. She seemed happy enough inside as she was enjoying herself and eating the strawberry plants. Unfortunately, once Stumpy spotted me she became distressed and even though I’d opened the entrance to the enclosure and quickly walked away, she had other plans. Her plans involved ripping a giant hole in the commercial grade bird netting and making her escape.
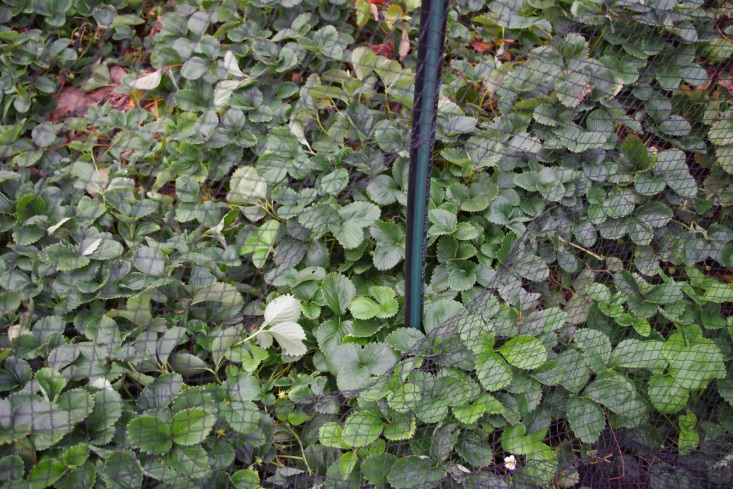 |
| Stumpy has ripped a giant hole in the strawberry enclosure |
Sometimes you have to abandon a project as a bad idea and use the lessons that you have learned on a new project. The strawberry enclosure has now been declared a failed experiment. Not to worry though as the first of what will be multiple new berry beds are now under construction.
Before any of this could begin, I had to fix one of the hardest working tools here: My 20 year old electric hammer drill. That drill gets some serious punishment and just keeps on going. Unfortunately after some of the recent steel work, I pushed a drill bit through the original 20 year old chuck and pretty much destroyed it. A chuck is the fancy name for the bit on the very front of the drill where you insert the drill bits and it holds them in place. I didn’t even know that it was possible to destroy one, but there you go.
I was a bit sad because other than the totally destroyed chuck, the drill worked just fine. It is amazing what is on the Internet, because after a couple of minutes searching, I had an instruction on how to go about replacing the damaged chuck. I immediately ordered a new chuck and it arrived in the mail this week: Yay!
 |
| Trusty electric hammer drill with brand new chuck |
Honestly, fitting the new chuck was a 10 minute job, despite the damage to the original unit.
Now that the trusty drill was back up and running, I could get to work and start building a brand new Stumpy proof berry enclosure. The new enclosure will have a sturdy treated pine post and rail fence, a steel gate and utilise locally sourced saplings as pickets. Take that Stumpy!
Long term readers may remember that the posts have already been cemented in the ground for the new berry enclosure before Christmas. Also the steel gate has already been welded, hung and latched in place. The steel gate actually began life as a very solid security door which I modified for this particular use.
The newly refurbished electric drill was again hard at work installing rails for the new fence.
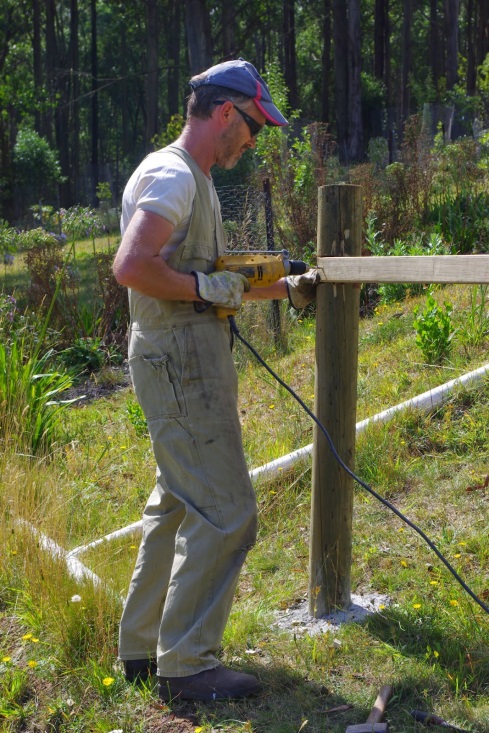 |
| Rail being installed onto the new Stumpy proof berry enclosure |
The chainsaw was used to cut holes into the posts and that was a really awkward and difficult task. Looking at the photos now, it looks like I’m developing some sort of funky dance move. We can call this funky new dance move: The Cherokee Shuffle (Everyday, I’m shufflin’)!
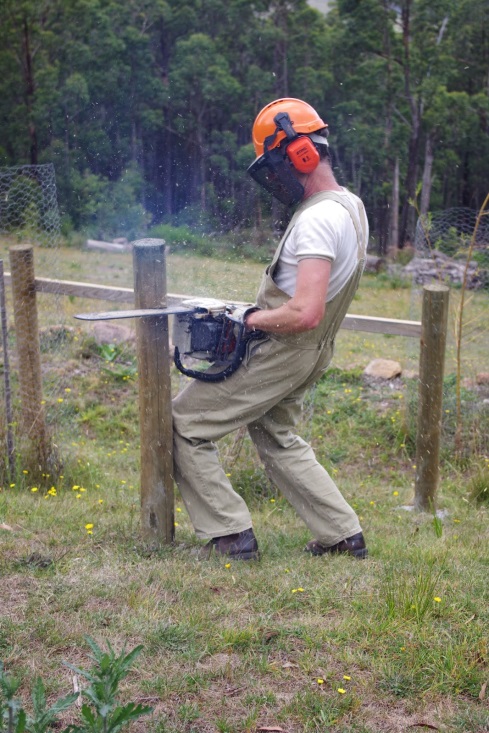 |
| Cutting holes into a post for a post and rail fence – dance move 1 |
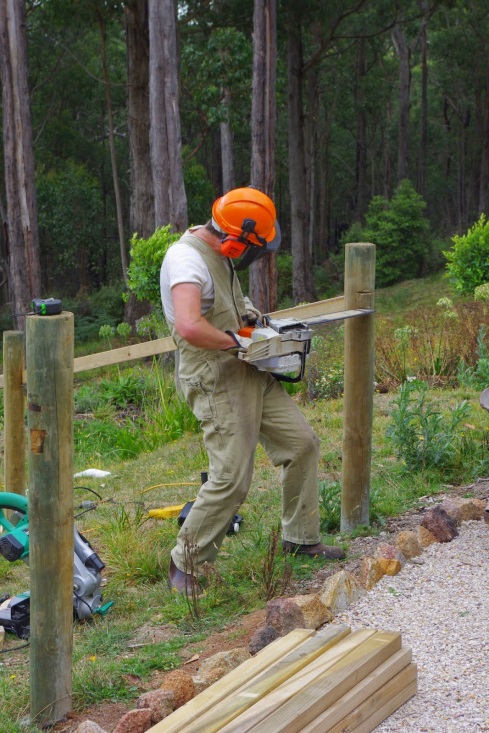 |
| Cutting holes into a post for a post and rail fence – dance move 2 |
Earlier this afternoon, all of the rails had been installed on the new berry enclosure. Hopefully over the next few weeks, I’ll begin installing the pickets which will be cut from local saplings.
 |
| All of the rails have now been installed on the new berry enclosure |
It is definitely blackberry season here because I travelled up to my favourite, non-sprayed blackberry patch and picked another couple of kilograms (about 4 pounds) of blackberries. It has been the best year for blackberries here that I can recall as the rain has fallen at exactly the right time and in the right amounts for those plants.
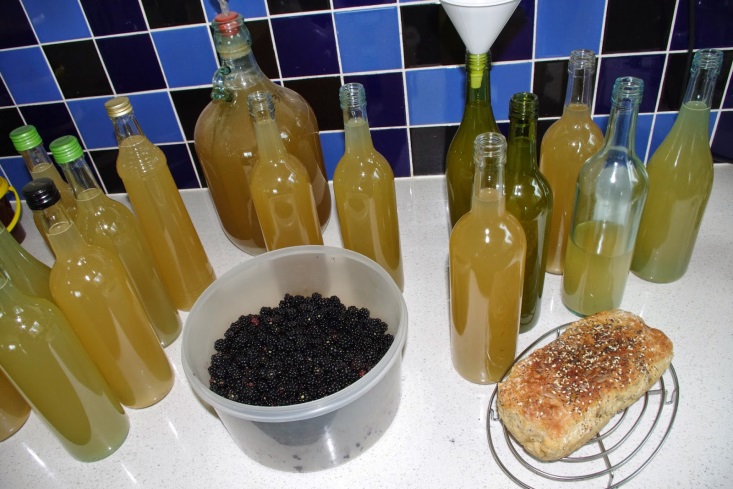 |
| More blackberries in amongst many bottles of mead and some home baked bread |
The first of the Black Russian cherry tomatoes have started to ripen over the past few days. They’re ripening about 2 weeks early this year. By July, I’m expecting to harvest about 50 kilograms (over 100 pounds) of the fruit. Yum!
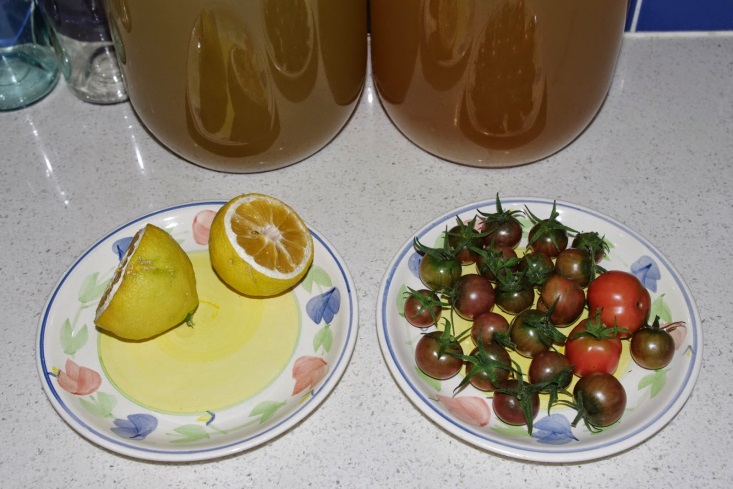 |
| Black Russian cherry tomatoes have begun ripening about two weeks early this year |
The Southern brown tree frogs are continuing to enjoy the warm and humid conditions at the farm this year and I spotted this healthy specimen on the new concrete staircase a couple of nights back.
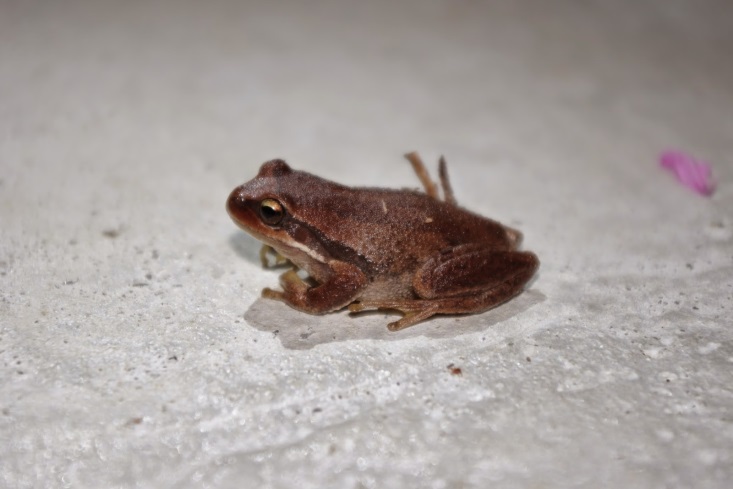 |
| Southern Brown tree frog on the new concrete staircase |
The bright yellow recently repaired trailer made its maiden voyage this week and it was all in a good cause too. The trailer travelled from here to the outer northern suburbs of Melbourne to pick up a very industrial looking Yamato 5 thread overlocker machine for my lady’s birthday. The machine itself works very smoothly and also alarmingly quickly, but it does require a bit of a clean and freshen up, which I’ll do over the next few weeks.
 |
| Refurbished bright yellow trailer on its maiden voyage to bring back a serious overlocker machine to the farm |
It is very disappointing to now have dirt on the paint work of the trailer, it somehow just doesn’t seem right now! Hehe!
On Saturday, the Macedon Ranges Sustainability Group held its annual festival in Woodend. I manned the stall for the Riddells Creek Seed Savers Group for the day and had an absolute ball. It was a whole lot of fun and thousands upon thousands of people came to the festival. Honestly, it was no hardship for me to rubbish on about plants and seeds for hours on end and so many people visited the stall, that they almost wiped out the Groups entire stock of seeds and seedlings. It was a pleasure to meet one of the regular readers of the blog too (shout out to rabidlittlehippy). And everyone that I met had such great questions about all sorts of things. It was a real pleasure.
 |
| Me banging on to someone at the Macedon Ranges Sustainability Group festival |
How did I get here?
My thinking aligns with the old saying: “Strike while the iron is hot”.
So way back in November 2009, I commenced building this house – even though neither the roof nor the windows had been designed to meet the new bushfire standards. In fact, I started construction even though I was unable to commence any work at all on the roof. Unfortunately, I’d already purchased the double glazed and toughened glass windows by that date so it was a real gamble as to whether I’d even be allowed to use those particular windows in construction.
Yeah, it was a little bit stressful, but I simply got on with the job at hand, whilst sorting out the paperwork nightmare at night.
How did the house get here?
As I already had a level house site, in November 2009 I commenced construction of the house.
Fortunately for me, the editor of this blog has a better brain for geometry than I do, so she calculated the mathematics required to ensure that the building ended up being square by working out where to put the stump holes. That is no small feat! We then painted yellow on the soil where the stump holes had to be dug. A bobcat and driver was hired to dig the 115, 2 metre (7 feet) deep holes as required by the soil engineer. That depth seemed like a bit of overkill, but the house has not moved at all since it was constructed all those years ago.
 |
| A bobcat was used to dig the very deep holes for the concrete stumps for the house |
The holes had to be cleaned out prior to inspection, and this usually involved a tool that had a long shaft with a round Pacman style flat plate which was used to lift loose soil from the bottom of the hole. Sometimes I had to dive in to the hole to grab the dirt with my hands and once I was stuck upside down in a very deep hole and had to wait until the editor could pull me out!
 |
| Me about to dive into another hole in order to clean it prior to inspection |
I was very grateful to be able to commence actual construction work and the photo below shows several concrete stumps in place. There was nothing fancy about the method used to ensure they were all positioned properly as it usually involved tape measures and string lines.
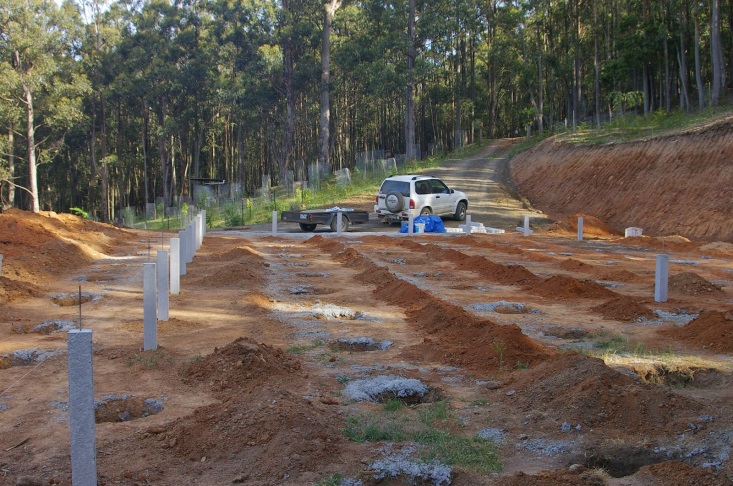 |
| Several stumps have now been installed |
The temperature outside here at about 9.00pm is 15.6 degrees Celsius (60’F). So far this year there has been 131.2mm (5.2 inches) of rainfall which is up from last week’s total of 105.6mm (4.1 inches).
Posted by Cherokee Organics at 21:41 35 comments: ![]()